
Articles in this section
- How to Uniquely Identify Hotlink Module Zones in Archicad Schedules?
- How to Set the Origin of a 3D Texture in Archicad?
- Why Do Drawings Exported to PDF in Archicad Generate Very Large Files?
- How to Map a Custom Archicad Property to an IFC Property?
- How to Remove an Archicad Educational Licence from a Computer?
- How to Change an Archicad File Started in the International Version to the Spanish Version?
- How to Import a PDF to Use as a Reference in Archicad?
- How to Use Educational and Commercial Versions of Archicad on the Same Computer?
- How to Get the Archicad Connection with Twinmotion?
- How to Create a Structural Frame with the Create Truss Tool in Archicad?
How to Map a Custom Archicad Property to an IFC Property?
If you need a custom Archicad property to be exported within an IFC file, you must configure it using the export IFC Translator’s Property Mapping.
This process lets you decide which IFC entity the information will be stored in, which property set it will appear in, and which Archicad property will be used as the source of the data.
Important: For the export to work correctly, the custom property must have a value on the model elements, and the file must be exported using the same IFC Translator in which the mapping was configured.
How to map a custom Archicad property to an IFC property
Step 1 - Open the IFC Translators
- In Archicad, go to File > Interoperability > IFC > IFC Translators...
- In the list on the left, select the translator you use for export.
For example, you can select the general export translator if that is the one you normally use.
Step 2 - Open the Property Mapping settings
- In the panel on the right, locate the Property Mapping option.
-
Click the three-dot (...) button next to the setting’s name.
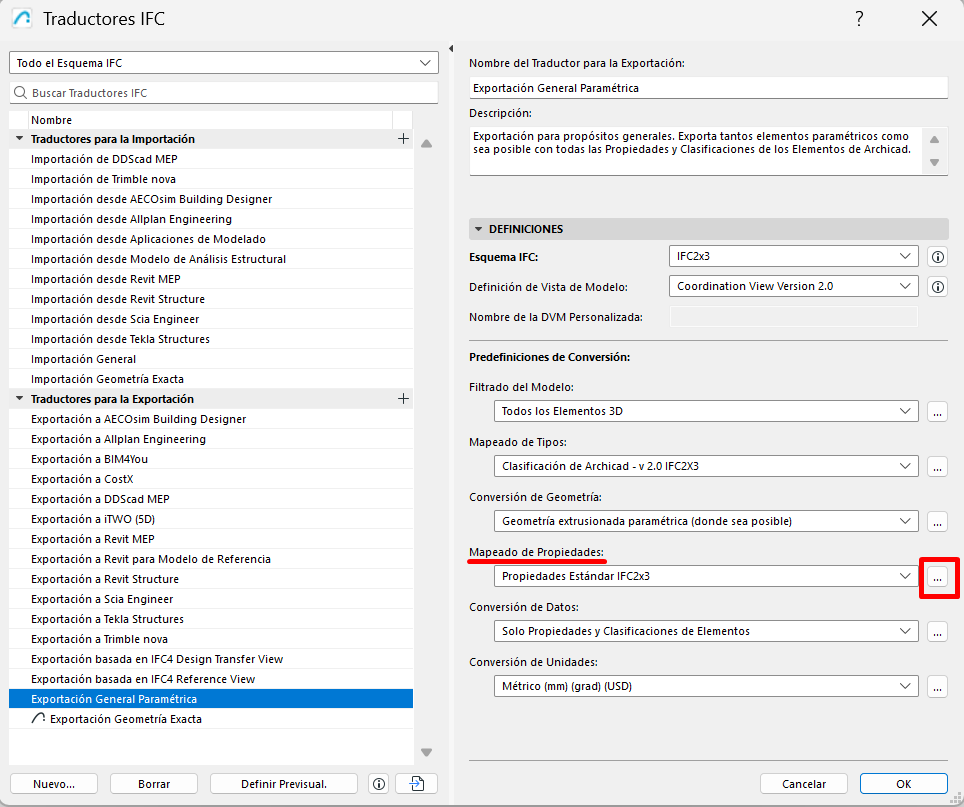
The property mapping dialog box for IFC export will open.
Step 3 - Open the mapping definitions window
-
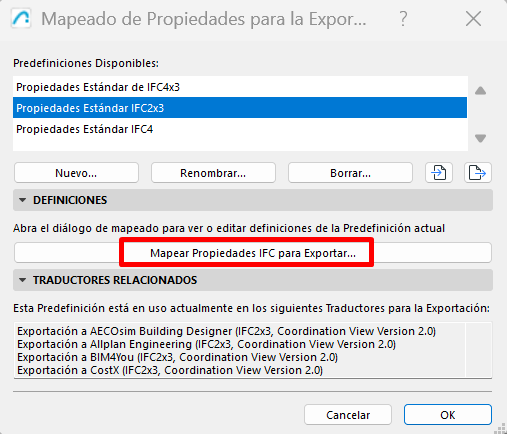
Inside that dialog box, click Map IFC Properties for Export.
Step 4 - Select the target IFC entity
- In the left-hand column, find the IFC entity tree.
- Expand the categories until you find the entity that corresponds to the type of element you want to export.
- Click the entity to select it.
Common examples:
- IfcWall for walls.
- IfcSlab for slabs.
- IfcObject for generic objects.
Note: It is advisable to assign the property to the IFC entity that genuinely corresponds to the element, to keep the exported model consistent.
Step 5 - Create the target IFC property
-
In the middle column, IFC Properties, click New.
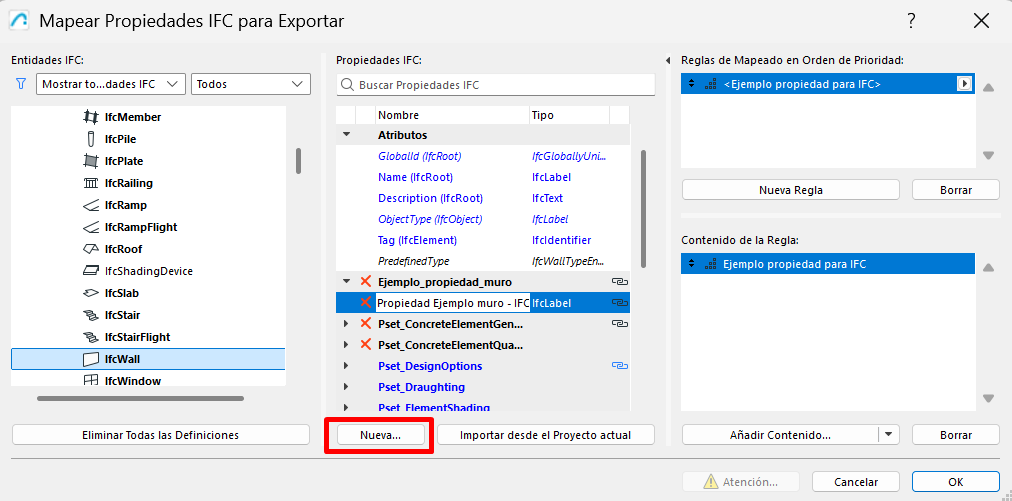
- In the pop-up window, fill in the fields for the new property:
- Property Set name: enter the name of the group the property will be stored in.
- Property name: enter the name you want it to appear under in the IFC viewer.
- Property type: select Single Value.
- Click OK.
The new property will appear within the selected IFC entity.
Step 6 - Link the custom Archicad property
- Select the IFC property you just created.
-
In the right-hand column, Mapping Rules, click Add Mapping Rule.
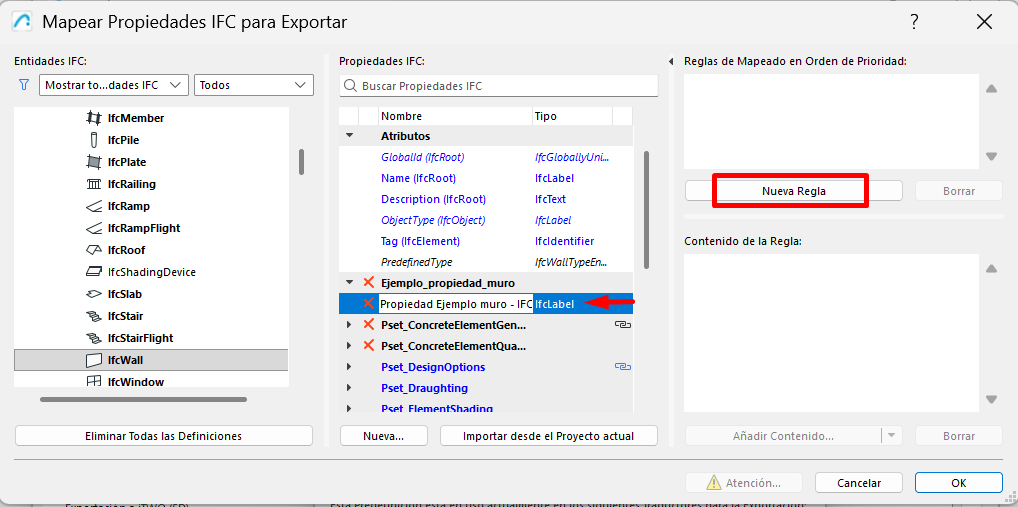
- In the new row, click Add Parameters/Properties...
- Search for the custom Archicad property you want to export.
-
Select it and click Add.
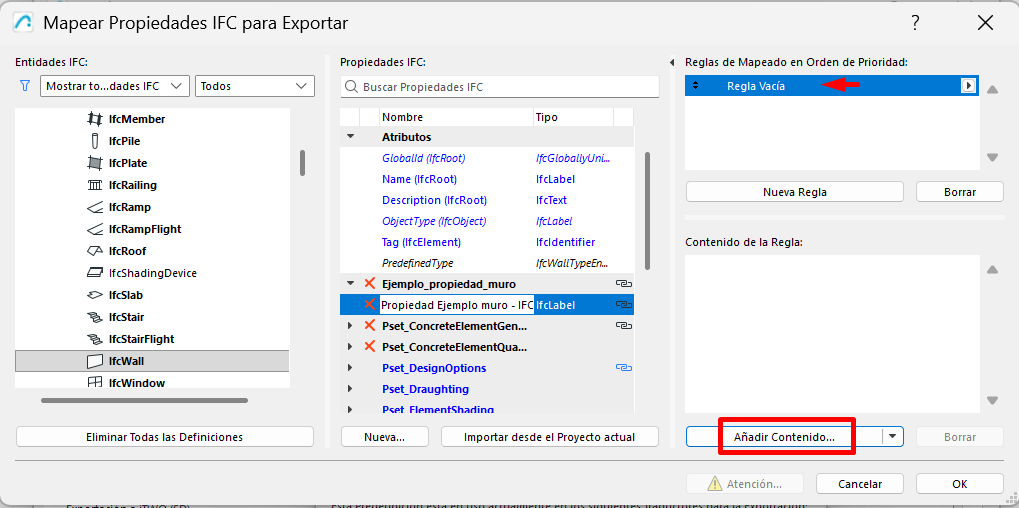
With this, Archicad will know which model property to export within the IFC property created in the previous step.
Step 7 - Save the setting and export the IFC file
- Click OK to close the mapping definitions window.
- Click OK again to save the changes to the IFC Translator.
- Go to File > Save As...
- Choose IFC as the file format.
- Make sure you select the translator you just modified.
Related articles
- How to Uniquely Identify Hotlink Module Zones in Archicad Schedules?
- How to Set the Origin of a 3D Texture in Archicad?
- Why Do Drawings Exported to PDF in Archicad Generate Very Large Files?
- How to Remove an Archicad Educational Licence from a Computer?
- How to Change an Archicad File Started in the International Version to the Spanish Version?