
Articles in this section
- How to Uniquely Identify Hotlink Module Zones in Archicad Schedules?
- How to Set the Origin of a 3D Texture in Archicad?
- Why Do Drawings Exported to PDF in Archicad Generate Very Large Files?
- How to Map a Custom Archicad Property to an IFC Property?
- How to Remove an Archicad Educational Licence from a Computer?
- How to Change an Archicad File Started in the International Version to the Spanish Version?
- How to Import a PDF to Use as a Reference in Archicad?
- How to Use Educational and Commercial Versions of Archicad on the Same Computer?
- How to Get the Archicad Connection with Twinmotion?
- How to Create a Structural Frame with the Create Truss Tool in Archicad?
How to Uniquely Identify Hotlink Module Zones in Archicad Schedules?
When a project uses repeated Hotlink Modules — for example, standard housing units, rooms, apartments, or modular units — it is possible to define the zones within the module itself and keep a single definition of it.
To later be able to distinguish the zones corresponding to each instance of the module in schedules or area charts, you can assign a different Master ID to each Hotlink Module instance in the host file.
How to Identify the Zones of Each Hotlink Module
The Master ID lets you add a specific identifier to each instance of a Hotlink Module. This identifier can then be used in schedules to differentiate the zones belonging to each housing unit, Story, entrance, or other repeated unit in the project.
Important: The zones can remain defined within the Hotlink Module. There is no need to duplicate the module or individually modify the zones for each instance.
Step 1 - Select the Hotlink Module
- In the host Archicad file, select the instance of the Hotlink Module you want to identify.
- Right-click on the module.
-
Select Hotlink Selection Settings.
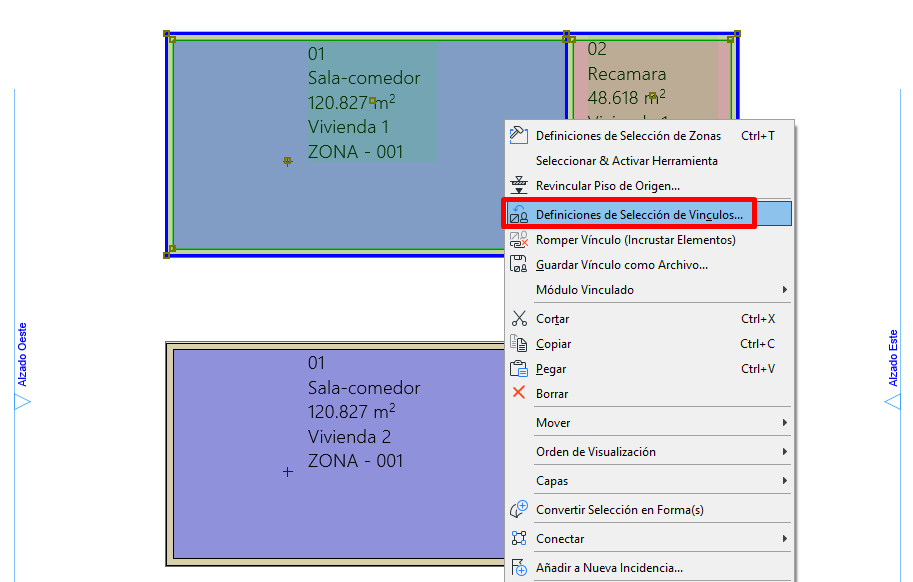
Step 2 - Assign a Master ID
- In the Hotlink settings, go to the Hotlink Definitions tab.
- Locate the Master ID field.
-
Enter a unique identifier for that instance of the module.
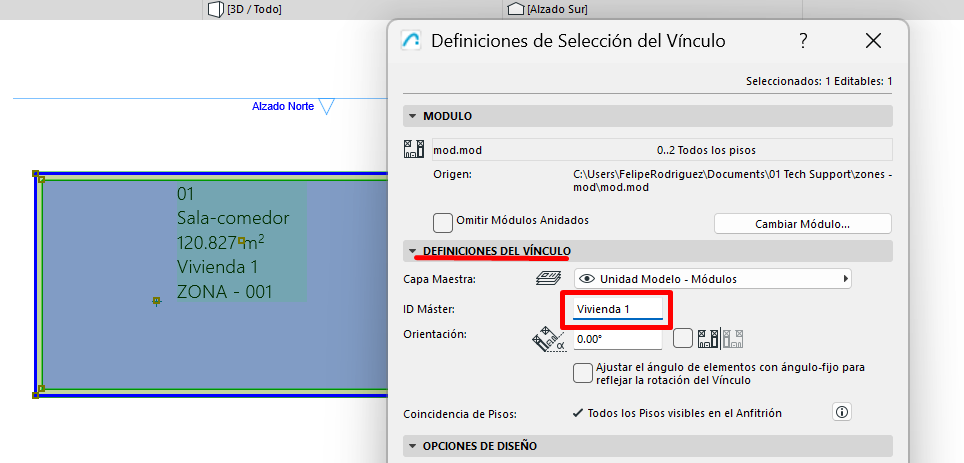
For example, you can use identifiers such as:
- Unit 01
- Unit 02
- Entrance A - Unit 03
- Story 02 - Unit B
Note: It's advisable to set a consistent naming scheme for the Master IDs before assigning them. You can use information such as unit, entrance, Story, or any combination that clearly identifies each instance.
Step 3 - Repeat the Process for Each Instance
Repeat the procedure for each instance of the Hotlink Module and assign a different Master ID to each one.
For example:
- Hotlink Module 1 → Unit 01
- Hotlink Module 2 → Unit 02
- Hotlink Module 3 → Unit 03
This way you can keep using a single definition of the module and its zones, while each instance is individually identified within the host file.
Step 4 - Show the Identification in the Zone Schedule
- Open or create the relevant zone schedule.
- Go to the schedule's criteria and fields.
-
Add the Hotlink and Element ID field.
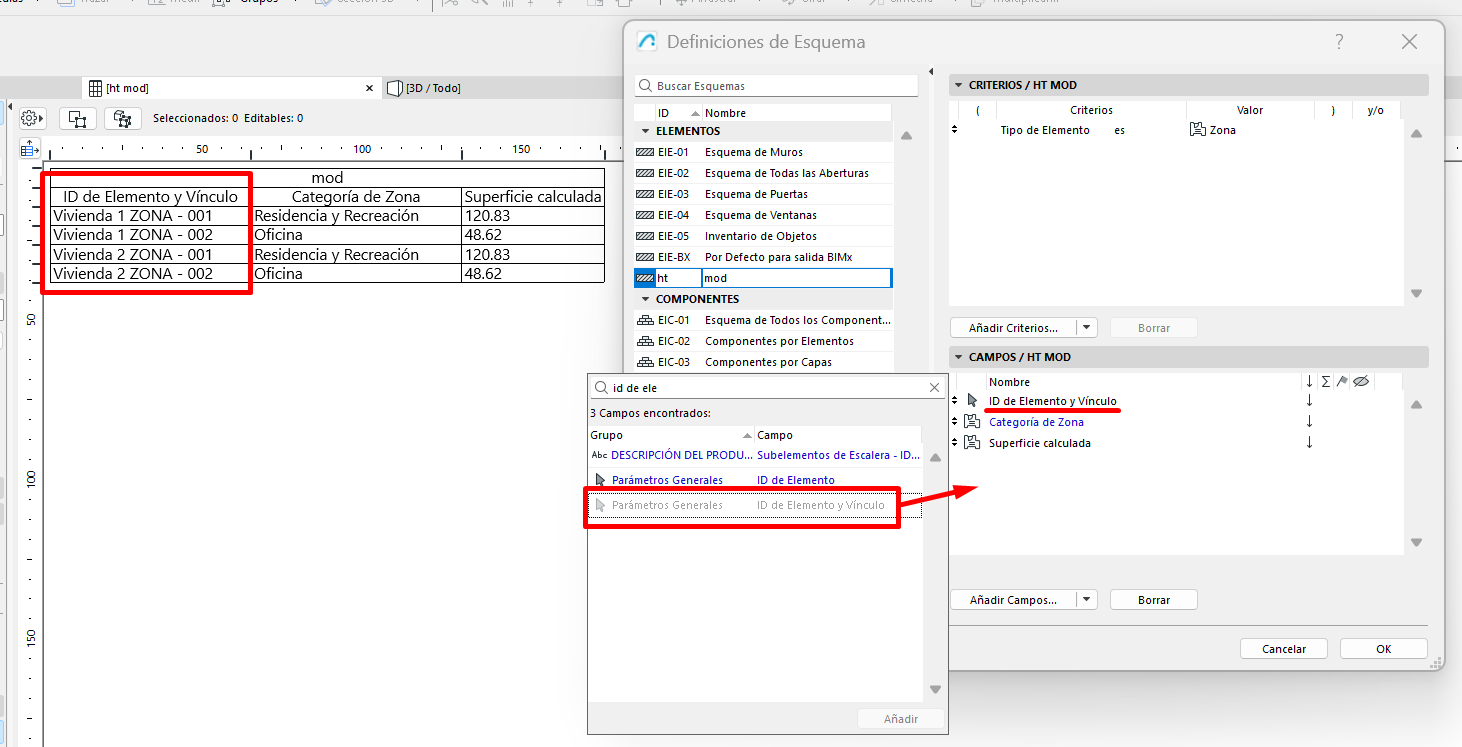
This field lets you show the zone's identification together with the identification associated with the Hotlink Module, making it easier to tell apart zones coming from different instances of the same module.
Example: If a zone within the module has the ID Z01 and each instance has a different Master ID, the schedule will let you distinguish that same zone according to the module instance it belongs to.
Recommended Methodology
For projects with a large number of repeated modules, we recommend:
- Keeping a single Hotlink Module definition whenever the units are equivalent.
- Defining the zones directly within the module.
- Assigning a unique Master ID to each instance from the host file.
- Using consistent naming based on entrance, Story, unit, or another project identifier.
- Adding the Hotlink and Element ID field to schedules to get a differentiated identification of the zones.
This way you can keep the module's geometry and information centralised, avoiding duplication, while retaining a specific identification for each unit in the area charts.
Related articles
- How to Set the Origin of a 3D Texture in Archicad?
- Why Do Drawings Exported to PDF in Archicad Generate Very Large Files?
- How to Map a Custom Archicad Property to an IFC Property?
- How to Remove an Archicad Educational Licence from a Computer?
- How to Change an Archicad File Started in the International Version to the Spanish Version?