
Articles in this section
- How to Uniquely Identify Hotlink Module Zones in Archicad Schedules?
- How to Set the Origin of a 3D Texture in Archicad?
- Why Do Drawings Exported to PDF in Archicad Generate Very Large Files?
- How to Map a Custom Archicad Property to an IFC Property?
- How to Remove an Archicad Educational Licence from a Computer?
- How to Change an Archicad File Started in the International Version to the Spanish Version?
- How to Import a PDF to Use as a Reference in Archicad?
- How to Use Educational and Commercial Versions of Archicad on the Same Computer?
- How to Get the Archicad Connection with Twinmotion?
- How to Create a Structural Frame with the Create Truss Tool in Archicad?
How to Change an Archicad File Started in the International Version to the Spanish Version?
A file started in Archicad International can be opened and adapted to work in Archicad Spanish. In projects that already use the Global Library, the library side is resolved by changing its language. After that, you need to review attributes, classifications, properties and documentation to leave the file aligned with the Spanish environment.
Important Notes Before You Start
- Make a backup before you start. Always work on a copy of the file, never on the original.
- This article is intended for files that use the Global Library. If the file contains the monolithic library, it must first be migrated to the Global Library before following this procedure.
- This is not a recommended procedure for very advanced projects or projects with many custom attributes. In those cases, it should only be done if absolutely essential.
- Changing from International to Spanish does not automatically convert the whole project to the Spanish standard.
- Library, attribute, favourite, label, property and documentation elements that are not Archicad standard require manual review.
How to Convert an Archicad File Started in the International Version to the Spanish Version
Step 1 - Make a Copy and Open the File with Archicad Spanish
Open the original project, save a copy, and always work on that copy in the Archicad Spain installation.
Step 2 - Change the Language of the Global Library
If the file already uses the Global Library, there is no need to replace the library. What you need to do is change the language of the library itself.
In summary:
- open the Edit GDL Library Parts toolbar;
- access that toolbar's drop-down menu;
- open Library Localization Preferences;
- add the desired language and adjust its priority in the list of active languages;
- close the dialog box to apply the changes.
With this, Archicad will update the displayed language of objects and other elements associated with the Global Library.
If you need the full step-by-step procedure, see the other Zendesk article: How to Change the Language of the Global Library?
Step 3 - Replace the Default Attributes with the Spanish Template
Important Note
- This process will replace the default attributes.
- If you have customised any default attribute, that change will be removed.
- This process will not affect created attributes, including duplicates.
- Created, duplicated or customised attributes must be reviewed and edited manually.
Procedure
- Options > Element Attributes > Attribute Manager
- go to the All tab;
-
import the Spanish template on the right-hand side of the window;
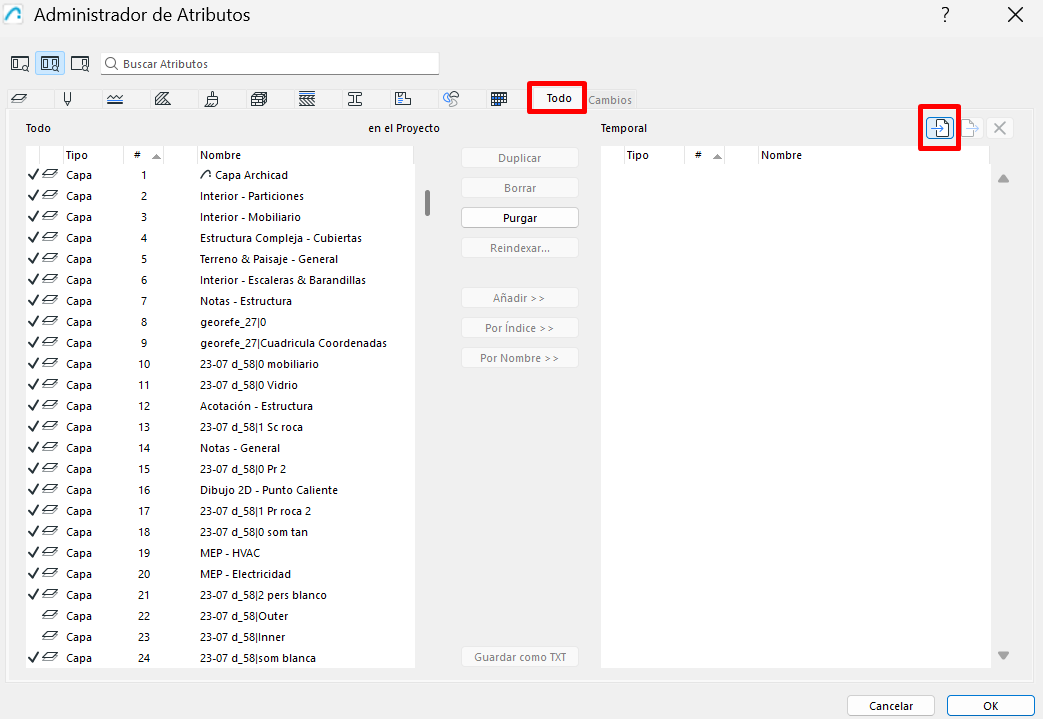
- select all the attributes, or only the ones you need;
-
click By Index.
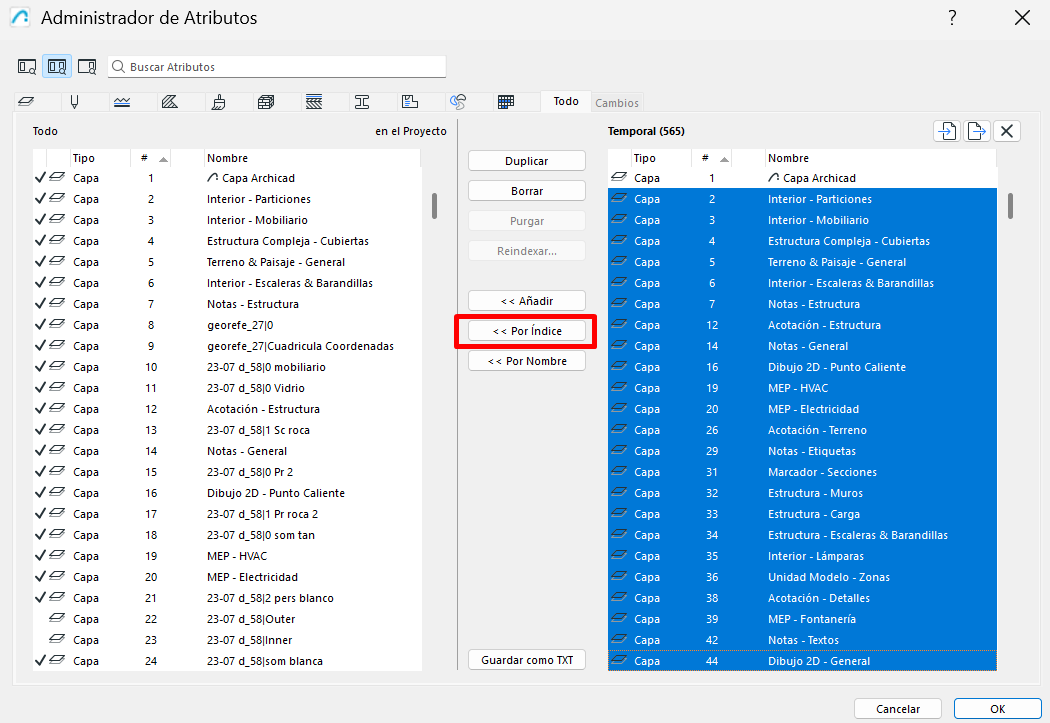
This step lets you replace the standard attributes with those from the Spanish template, respecting the index correspondence.
Step 4 - Import the Spanish Classification System
You need to import the Spanish classification system into the file you are converting to Spanish.
Export the Classification System from the Spanish Template
- open the Spanish template or a new project;
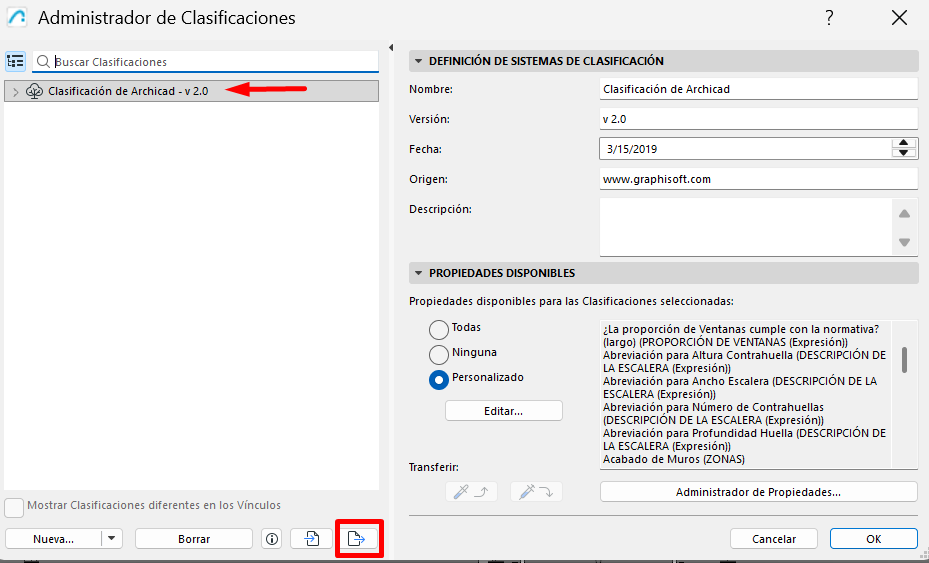
- go to Options > Classification Manager;
- select the classification system;
-
export it.
Import the Classification System into the File Being Converted
- open the file you are converting to Spanish;
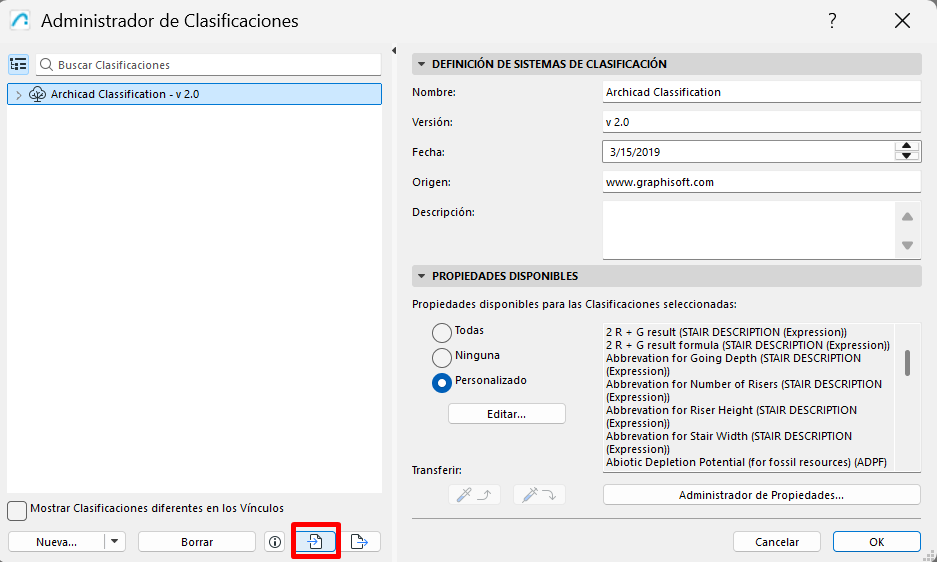
- go to Options > Classification Manager;
-
import the XML of the Spanish classification system.
Step 5 - Assign the Spanish Classification Using a Schedule
Importing the Spanish classification system does not automatically assign a classification to the elements. A simple way to do this is by using a schedule.
Procedure
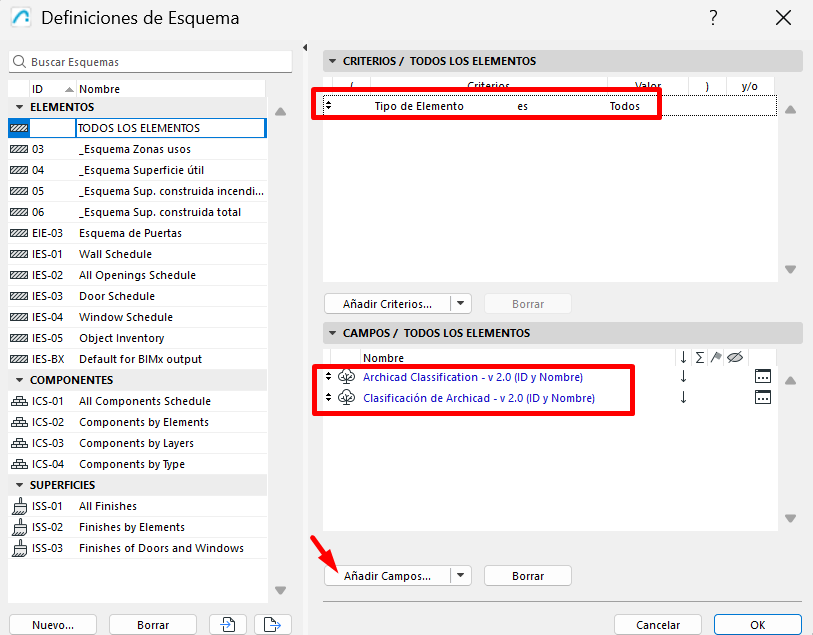
- create a new element schedule;
- in the Criteria section, select: Element Type > is > all;
-
in the fields, select the two classification systems: English and Spanish;
-
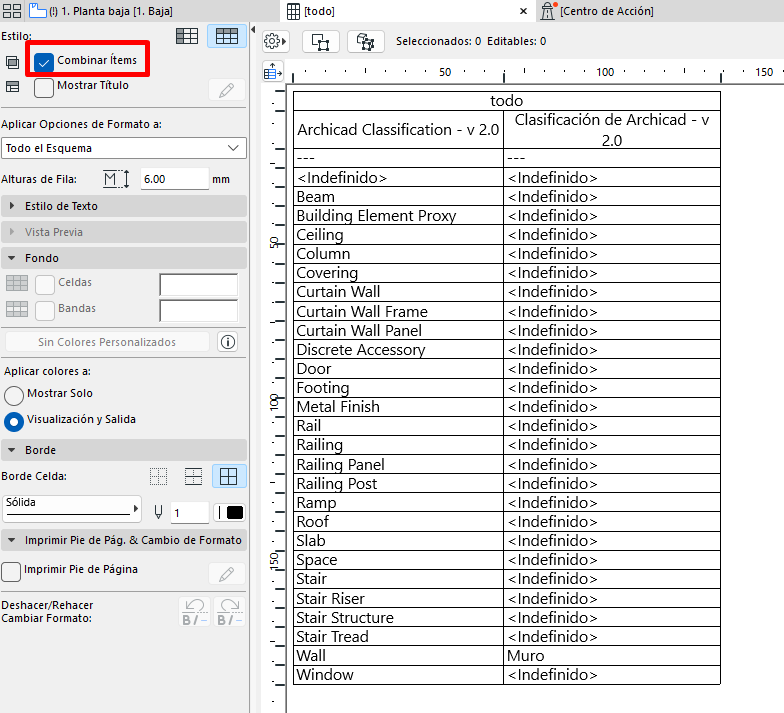
tick the Merge Same checkbox;
-
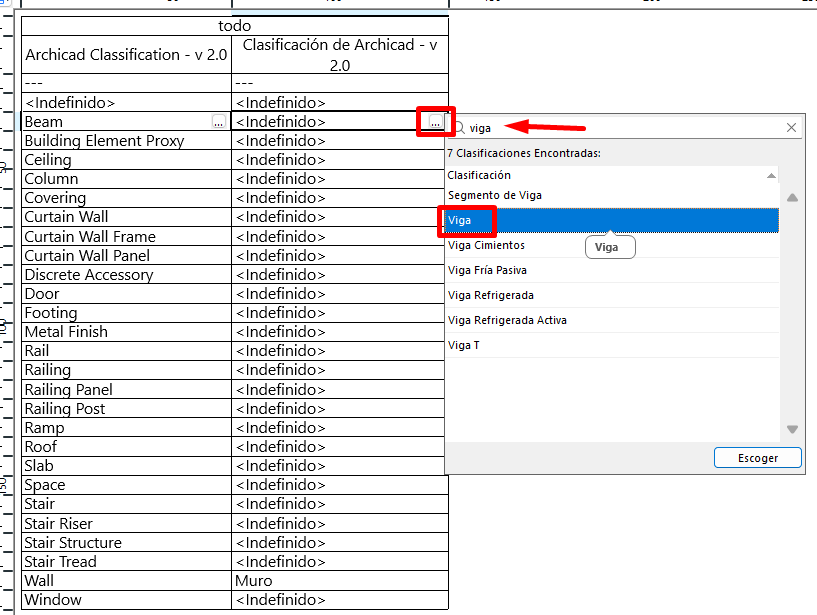
change the Spanish classification from Undefined to the equivalent classification you see in English in the other column.
Important Note
If it does not let you change one or any of the cells, the objects may be locked or on hidden layers. Unlock all elements and make all layers visible before continuing.
Step 6 - Enable the Spanish Classification in Custom Properties
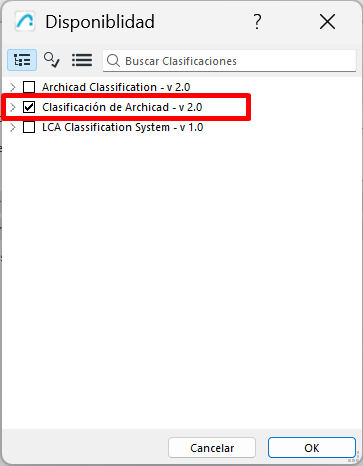
For custom properties, you need to enable their availability for the Spanish Archicad classification.
Procedure
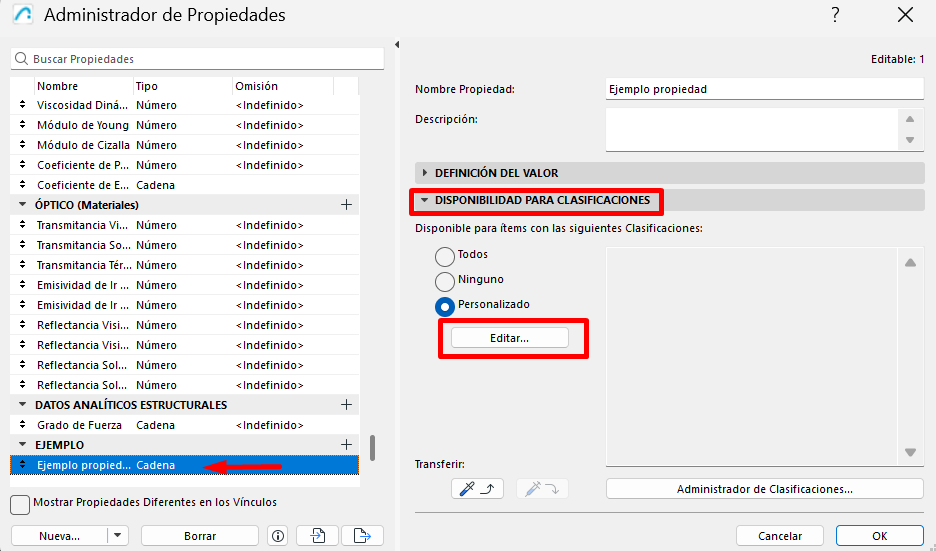
- Options > Property Manager;
- select the custom properties;
-
in the Property Availability for Classifications section, click Edit;
-
enable the Spanish Archicad classification.
Step 7 - Review and Edit Properties Using the Schedule
Next, use the same schedule you created for the classifications.
Procedure
- in the Fields section, add all the properties that you have edited or that have a value in English, and their Spanish equivalent.
If there are only a few and you can edit them manually, do so directly in the schedule.
If there are many, you can use an automated method.
Automated Method
- depending on whether the property repeats across the same elements, you can leave the Merge Same checkbox ticked;
- if not, untick the Merge Same checkbox;
- go to File > Interoperability > Classifications and Properties > Export Property Values from Schedule;
-
select the schedule and save it;
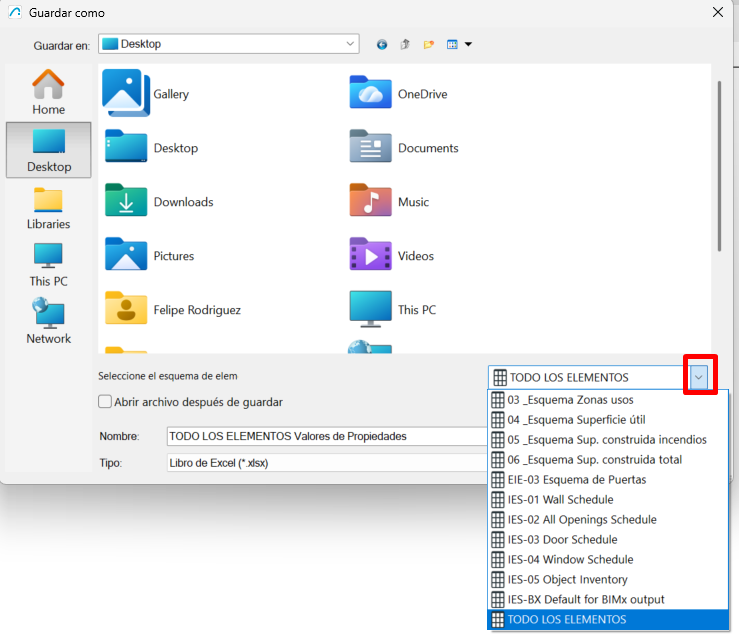
- in the exported Excel file, add all the necessary data;
- go back to Archicad and go to File > Interoperability > Classifications and Properties > Import Property Values in Elements.
Step 8 - Review Texts, Labels and Autotexts
This point is essential if the project is going to be documented in Spanish.
Check:
- view names;
- layout names;
- autotexts in title blocks;
- automatic labels;
- stamps;
- legends;
- classification or property texts.
It can happen that the model is correct but the documentation still carries over conventions from the International environment.
Step 9 - Regenerate Documentation
Before considering the project migrated, update:
- floor plans;
- sections;
- elevations;
- details;
- schedules;
- layouts;
- PDF publications.
The final review must be done on the documentation, not just on the model.
What Can Change or Cause Problems
Labels that lose data
If a label reads different properties or parameters, it may end up empty or show incorrect information.
Title blocks and autotexts in English
Very common when the file already had layouts prepared from the International version.
Duplicated or disorganised attributes
If several templates or libraries are mixed, duplicate materials, surfaces or composites can appear.
Differences in library organisation
In the Global Library, changing the localisation can also change how certain content is displayed or grouped.
Custom attributes not replaced
Manually created, duplicated or customised attributes are not automatically replaced by index and must be reviewed one by one.
Unassigned classifications
Importing the Spanish classification system does not automatically assign the classification to existing elements.
Custom properties without availability for the Spanish classification
If you do not enable the Spanish classification in the property's availability, you may not be able to use it correctly in the new environment.
Non-editable cells in the schedule
This usually happens when the objects are locked or on hidden layers.
Related articles
- How to Uniquely Identify Hotlink Module Zones in Archicad Schedules?
- How to Set the Origin of a 3D Texture in Archicad?
- Why Do Drawings Exported to PDF in Archicad Generate Very Large Files?
- How to Map a Custom Archicad Property to an IFC Property?
- How to Remove an Archicad Educational Licence from a Computer?