
Articles in this section
- How to Uniquely Identify Hotlink Module Zones in Archicad Schedules?
- How to Set the Origin of a 3D Texture in Archicad?
- Why Do Drawings Exported to PDF in Archicad Generate Very Large Files?
- How to Map a Custom Archicad Property to an IFC Property?
- How to Remove an Archicad Educational Licence from a Computer?
- How to Change an Archicad File Started in the International Version to the Spanish Version?
- How to Import a PDF to Use as a Reference in Archicad?
- How to Use Educational and Commercial Versions of Archicad on the Same Computer?
- How to Get the Archicad Connection with Twinmotion?
- How to Create a Structural Frame with the Create Truss Tool in Archicad?
How Can I Use Archicad Tools Creatively? Graphic Overrides - Project Phases
Reading time: 5 min.
In many projects, especially those with multiple intervention phases, the standard Renovation Phases tools in Archicad can fall short. What happens when the same element needs to be built in one phase and demolished in another? Or when the phases don't follow a traditional linear logic?
This article aims to explore a creative, simple and effective solution, using tools already available in Archicad: custom Properties and Graphic Overrides, to manage complex construction phases with full flexibility.
Step 1: Identify the Project Phases
Before you begin, it is essential to clearly define the Phases that will be involved in the project. This step involves gathering all the available information, both from the available technical documentation and from the specific needs of the different stakeholders involved (architects, engineers, developers, etc.).
The importance of this initial analysis lies in the fact that it will not only allow you to establish which Phases should be incorporated into the model, but also to understand the relationships that may exist between them: what is built first, what is demolished afterwards, which elements change state, etc.
This overall vision will be the basis for a coherent and effective implementation within Archicad.
Step 2: Classify Elements by Phase Using Custom Properties
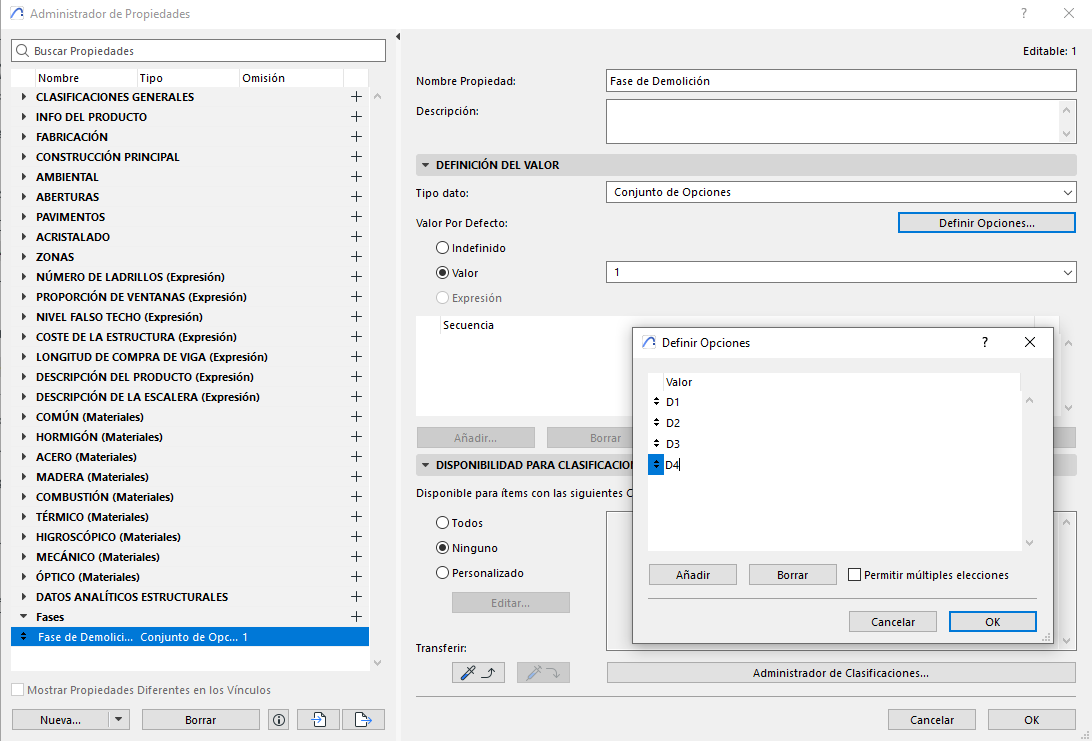
The second step is to create custom Properties in Options by selecting the Property Manager. These properties will allow us to assign a classification to the project elements according to their status in each Phase of the project. Example:
- Demolition Phase: to indicate in which Phase an element will be demolished (for example: Demolition D1, D2, D3, etc.).
-
Construction Phase: to indicate in which Phase an element will be constructed (for example: Construction C1, C2, C3, etc.).
Tips:
- Create a Property Group for the Phases with a clear name and Description indicating its use in the Property Manager, to make project administration and modelling easier in Archicad.
- When creating the Properties, choose a clear Name, and write a short Description indicating its use.
- In most cases, the Option Set is the recommended choice for this type of Property, because it keeps the data format consistent across all elements in the project.
- Don't forget to assign the Classification to the Properties, to activate them and make them visible in the dialog boxes of Archicad elements.
Step 3: Create Graphic Override Rules for Each State
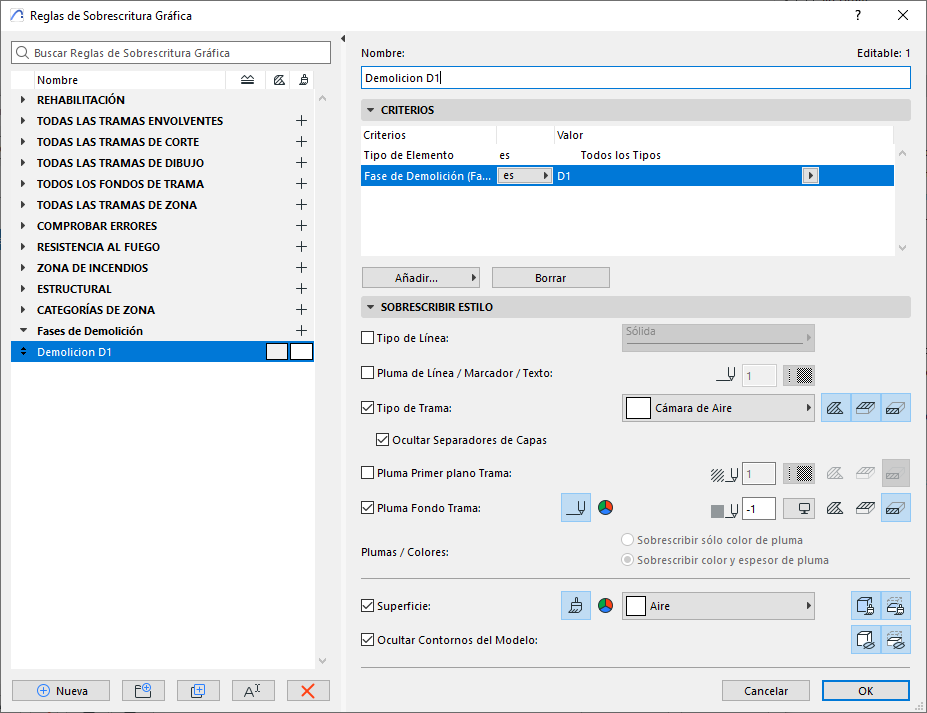
Once the Properties have been defined in the Property Manager, the next step is to configure the Graphic Override Rules in the Graphic Override Combinations dialog box. In addition to being created according to the criteria established in step 1, these rules will also allow us to visualise the elements according to their status. See the following image as an example of a Graphic Override Rule to hide the Demolished D1 elements.
Tips:
- Create a Group to group the project's Graphic Override Rules for the Phases, with a clear name indicating its use, to make project administration and modelling easier in Archicad.
- When creating the Graphic Override Rule, choose a clear Name indicating its use or its association with the Property created for the project's Phases.
Step 4: Create the Graphic Override Combinations
Once you have finished creating the Graphic Override Rules, create all the Graphic Override Combinations you will need to view or manage in the project, choosing the different Graphic Override Rules, with a clear name indicating its use.
How Do You Manage Elements with Multiple States?
In some cases, the same element can be new in one phase and demolished in another. To manage this correctly, it is recommended to:
- Separate the Properties in a logical order: There is no rule requiring all of the project's Phases to be included in a single custom Property. Separation is even recommended if the same construction element can have different construction Phases.
- Create Graphic Override Rules to hide elements for each Phase of the project: In this particular type of case, Graphic Overrides are being used to replace the use of the project's Renovation Phases, due to the complexity of the Phases. This does not mean that Archicad's construction elements will automatically disappear if an element should not appear in a particular Phase.
Advantages of This Approach
- This approach means that custom Properties can be used in Schedules, Labels and Dynamic Tables, and therefore allows you to:
- Generate schedules for each Phase of the project.
- Automatically label elements according to their status.
- Filter elements in planning schedules or budgets.
- Largely avoids duplicating Archicad's construction elements according to the project Phase, making the model lighter.
- Partly avoids the use of Archicad Layers to define an element's construction Phase, which in this case is simply incompatible.
- Furthermore, by not depending exclusively on the Renovation Phases, a more complex phase logic can be maintained without losing control over the project documentation.
- Ability to export the project's custom Phases to IFC.
Frequently Asked Questions (FAQ)
Can I use this technique together with the standard Renovation Phases?
Yes, but it is recommended not to use the Renovation Phases if you are going to use this custom system, to avoid visual and documentation conflicts.
What happens if I change an element's phase?
You only need to update the corresponding Property. The Graphic Override Rules will adapt automatically.
Does this affect model performance?
Not significantly.
Additional Tips
- Create a control table linking each combination to the rules it contains. This will allow you to maintain full control over the project's graphic logic.
- We recommend reviewing the following resources to better understand the context and the tools available:
Related articles
- How to Uniquely Identify Hotlink Module Zones in Archicad Schedules?
- How to Set the Origin of a 3D Texture in Archicad?
- Why Do Drawings Exported to PDF in Archicad Generate Very Large Files?
- How to Map a Custom Archicad Property to an IFC Property?
- How to Remove an Archicad Educational Licence from a Computer?