
Articles in this section
- How to Uniquely Identify Hotlink Module Zones in Archicad Schedules?
- How to Set the Origin of a 3D Texture in Archicad?
- Why Do Drawings Exported to PDF in Archicad Generate Very Large Files?
- How to Map a Custom Archicad Property to an IFC Property?
- How to Remove an Archicad Educational Licence from a Computer?
- How to Change an Archicad File Started in the International Version to the Spanish Version?
- How to Import a PDF to Use as a Reference in Archicad?
- How to Use Educational and Commercial Versions of Archicad on the Same Computer?
- How to Get the Archicad Connection with Twinmotion?
- How to Create a Structural Frame with the Create Truss Tool in Archicad?
How to Add Rotation Parameters to a GDL Object in Archicad?
In Archicad, you can add custom rotation parameters to a GDL object, allowing you to control its orientation on the X, Y and Z axes directly from the parameters panel. This technique is especially useful for objects such as light fittings, technical elements or components with variable orientation.
Step 1 - Open the object in the GDL Editor
- Select the object in the project or from the Library Manager.
- Open it in the GDL Object Editor.
- Go to the object's Parameters section.
Step 2 - Create the rotation parameters
In the Parameters section, create three new parameters to control the object's rotation on each axis.
- Add a parameter named rotatex and set its type to Angle.
- Add a parameter named rotatey with type Angle.
- Add a parameter named rotatez with type Angle.
By default, you can assign them an initial value of 0°.
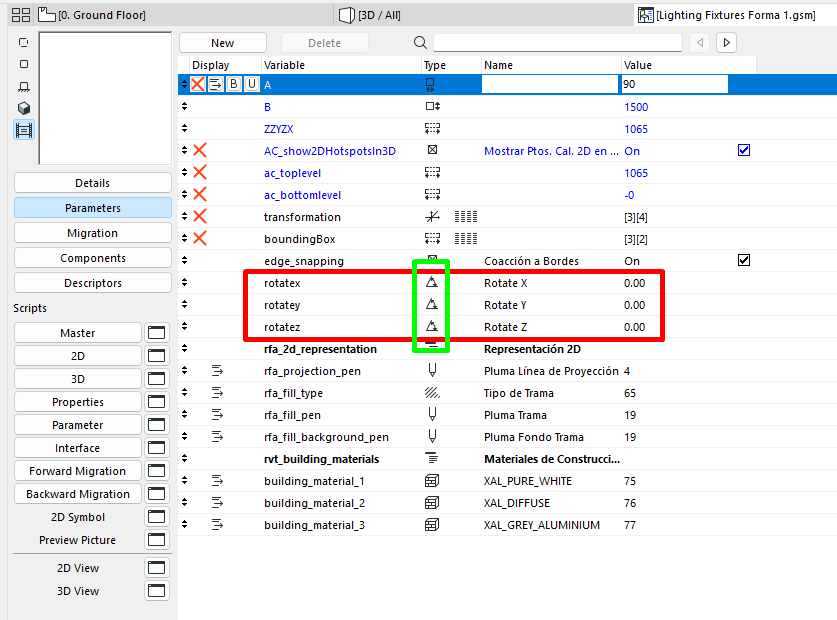
Note: It is important that the parameter type is Angle and not numeric, to ensure correct behaviour in 3D transformations.
Step 3 - Apply the rotation in the 3D Script
For the parameters to work, they need to be applied in the object's 3D Script.
- Go to the 3D Script section of the GDL editor.
-
Add the rotation commands, referencing the previously created parameters directly:
rotx rotatex
roty rotatey
rotz rotatez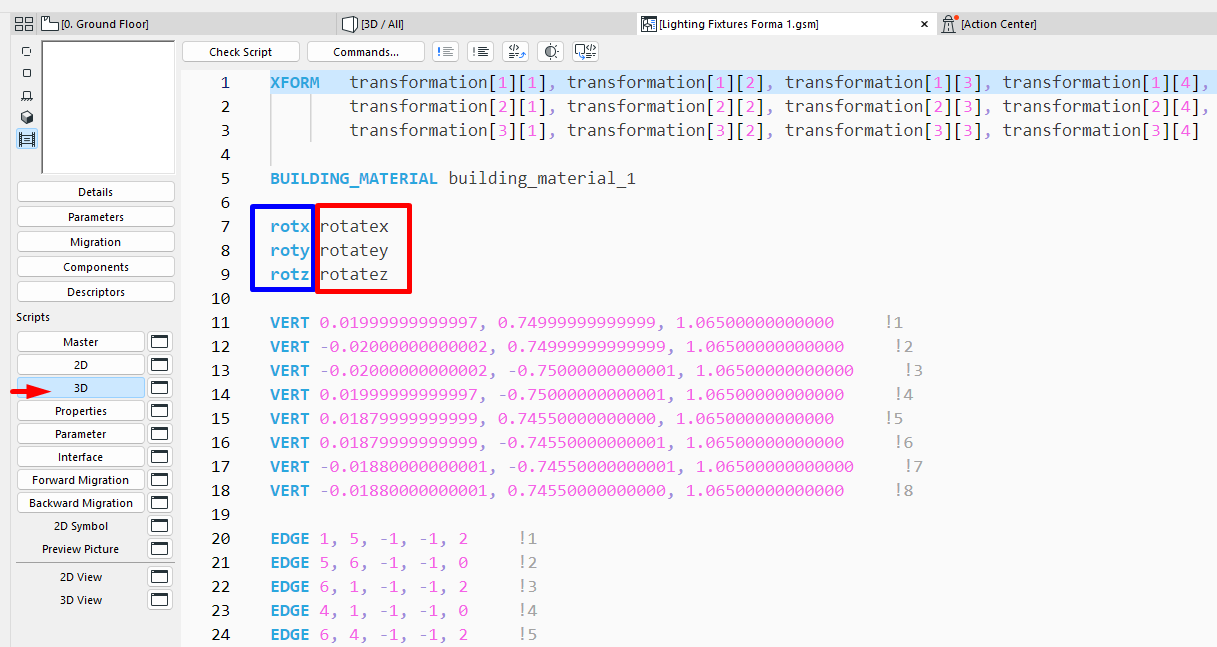
The recommended order is to apply the rotation on X first, then Y, and finally Z, to achieve predictable object behaviour.
Step 4 - Check that the object works correctly
- Save the changes to the object.
- Place the object in the model.
- Open its Parameters and change the rotation values.
- Check that the object rotates correctly in the 3D environment.
For example, assigning 180° to the rotatex parameter will completely flip the object over the X axis.
Related articles
- How to Uniquely Identify Hotlink Module Zones in Archicad Schedules?
- How to Set the Origin of a 3D Texture in Archicad?
- Why Do Drawings Exported to PDF in Archicad Generate Very Large Files?
- How to Map a Custom Archicad Property to an IFC Property?
- How to Remove an Archicad Educational Licence from a Computer?