
Articles in this section
- How to Uniquely Identify Hotlink Module Zones in Archicad Schedules?
- How to Set the Origin of a 3D Texture in Archicad?
- Why Do Drawings Exported to PDF in Archicad Generate Very Large Files?
- How to Map a Custom Archicad Property to an IFC Property?
- How to Remove an Archicad Educational Licence from a Computer?
- How to Change an Archicad File Started in the International Version to the Spanish Version?
- How to Import a PDF to Use as a Reference in Archicad?
- How to Use Educational and Commercial Versions of Archicad on the Same Computer?
- How to Get the Archicad Connection with Twinmotion?
- How to Create a Structural Frame with the Create Truss Tool in Archicad?
How to Show Section Markers in Section or Elevation Views in Archicad?
Reading time: 4 min.
In complex projects, it can be useful to display Section Markers directly in Section or Elevation Views. This makes it possible to locate the position of cuts within the model graphically and quickly access the related views. Archicad offers a simple procedure for doing this using Linked Markers.
Audience
This article is aimed at Archicad users of all levels who want to show Section Markers in Section or Elevation Views.
Prerequisites
Have Archicad open with an active project, and with Sections already created.
Have the necessary permissions to create and edit Sections and Elevations (in Teamwork projects).
Basic knowledge of the Archicad working environment.
Procedure
-
Open a Section or Elevation view in a new tab.
In the project’s Navigator, double-click one of the Section or Elevation views to open it in a new tab.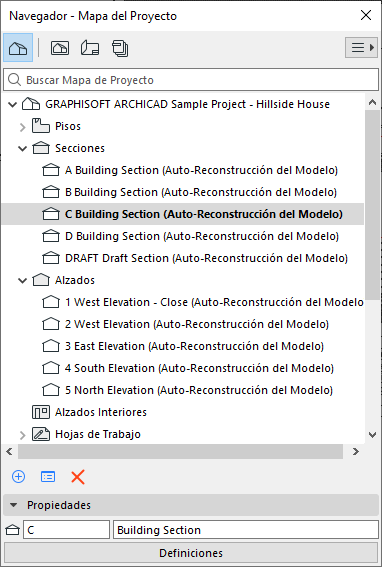
-
Activate the Trace option
On the top toolbar, activate the Trace tool (see image).
-
Select a Floor Plan view as reference
Click the drop-down arrow and select Choose Reference > Browse for Trace Reference...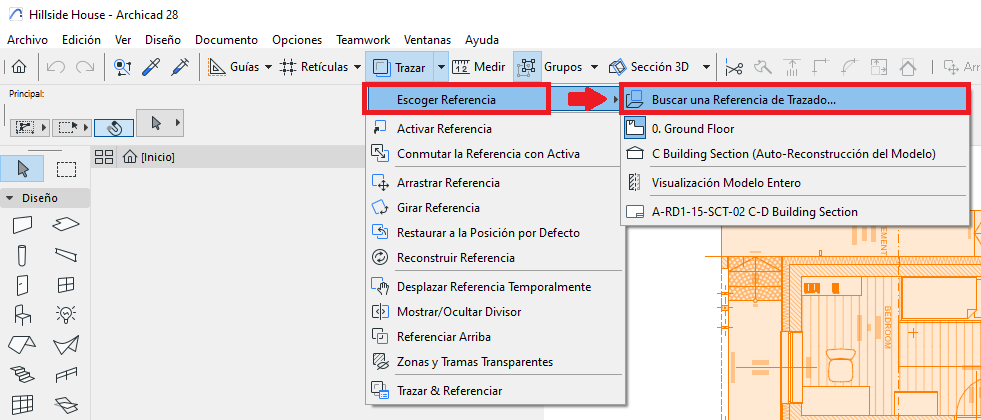
In the Choose Trace Reference menu, double-click a Floor Plan view (for example, the ground floor).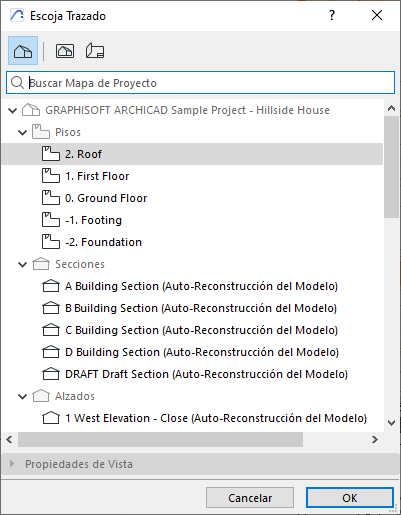
-
Copy the Section Markers from the Floor Plan
- Copy the Section Markers from the Floor Plan view.
- Paste them into the desired Section or Elevation View, making sure they are positioned correctly.
-
Convert the Markers into Linked Markers
Select the marker you just pasted, and in the marker’s Settings, change the Marker Type to Linked Marker.
For the Marker reference to option, select The first drawing of the selected view.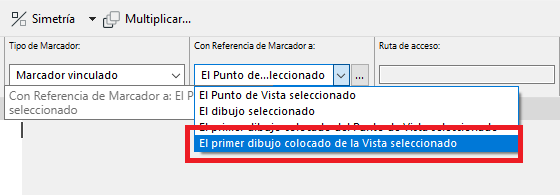
-
Assign the correct reference
When the Marker Reference Definition dialog box opens, double-click the Section that the copied Marker from the view should belong to.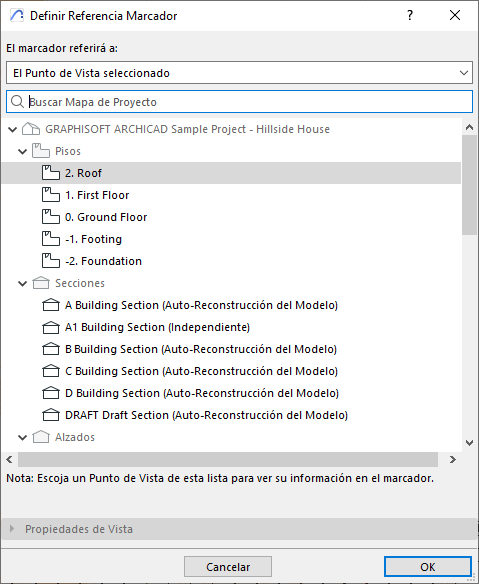
How to check it’s set up correctly
- Right-click the copied Section Marker to see the following options in the drop-down menu:
- Open with Current View Settings
- Views of this Section
- Open Section in a New Tab
- Show as Trace Reference
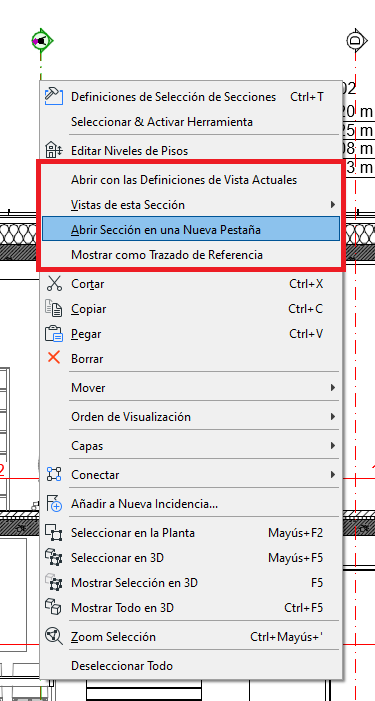
- If the view that opens matches the expected section, the setup is correct.
Technical tip
- Make sure the display of Section and Elevation Markers is switched on in Trace, so you can position them correctly.
- Bear in mind that copying and pasting markers can cause Archicad to generate independent sections or elevations (not linked to real views). Check the Navigator and delete any surplus views if necessary.
Related articles
- How to Uniquely Identify Hotlink Module Zones in Archicad Schedules?
- How to Set the Origin of a 3D Texture in Archicad?
- Why Do Drawings Exported to PDF in Archicad Generate Very Large Files?
- How to Map a Custom Archicad Property to an IFC Property?
- How to Remove an Archicad Educational Licence from a Computer?