
Articles in this section
- How to Uniquely Identify Hotlink Module Zones in Archicad Schedules?
- How to Set the Origin of a 3D Texture in Archicad?
- Why Do Drawings Exported to PDF in Archicad Generate Very Large Files?
- How to Map a Custom Archicad Property to an IFC Property?
- How to Remove an Archicad Educational Licence from a Computer?
- How to Change an Archicad File Started in the International Version to the Spanish Version?
- How to Import a PDF to Use as a Reference in Archicad?
- How to Use Educational and Commercial Versions of Archicad on the Same Computer?
- How to Get the Archicad Connection with Twinmotion?
- How to Create a Structural Frame with the Create Truss Tool in Archicad?
New in Archicad: What You Need to Understand About the Pen Table
Reading time: 4 min.
This article is aimed at all Archicad users who are just starting their journey with this BIM software, and especially at those coming from CAD programs with already-established working methodologies, who are trying to migrate those methodologies to Archicad. This article will help you consider the points you need to keep in mind so as not to waste time or effort unnecessarily. Specifically, we’ll explain the philosophy behind the Pen Sets that come with Archicad’s default template.
What Is the Pen Table?
The Pen Table in Archicad is a system that lets you have several Pen Sets to define how construction model elements will look in different views, based on:
- The print and/or publication scale
- The type of drawing (e.g. planning, architectural, construction, MEP, etc.)
- The use of colour (for example, for concept drawings)
- The need to visually distinguish elements
How Does the Pen Table Work?
In Archicad, pen index numbers (1 to 255) are fixed, but their appearance (colour and weight) and their description (see image) can vary by Pen and between Pen Sets. This means the same model element can be represented in different ways depending on the Pen Set applied to the generated view of the model.
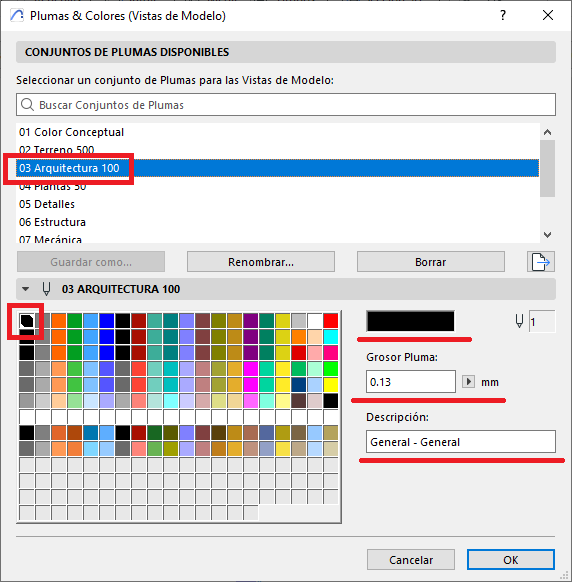
This approach allows for great flexibility: you can keep the model’s structure intact while adapting its graphic representation to the purpose of the View.
How Are Pens Organised Within a Pen Set?
Let’s take the set “03 Architecture 100” as an example — we can deduce it was set up for views generated for architectural drawings published at 1:100 scale. And if we look at it, we can deduce:
- That it’s displayed on a light background
- That it’s easy to identify which tool was used to model each element (see simplified example in image).
- That it maintains a logical and consistent organisation
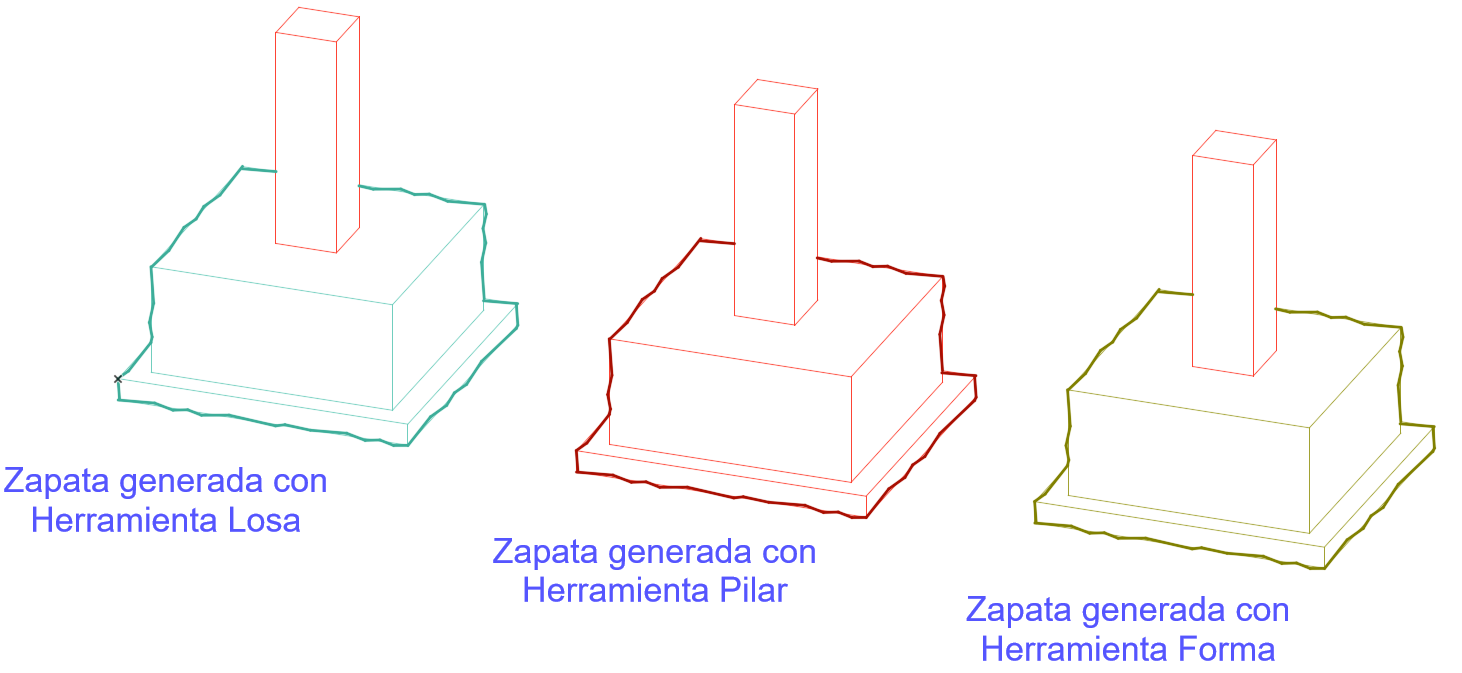
And the system applied to the pens is as follows:
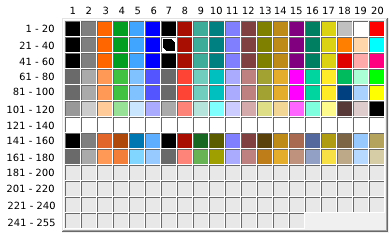
-
By zone:
- 1 -120: Archicad’s main modelling tools (Wall, Column, Mesh tool, etc.)
- 121 - 140: background colours
- 141 - 255: graphic definitions for Building Materials (Complex Profiles)
-
By row:
- 01 - 20: general pens (library objects)
- 21 - 40: structural elements (cut lines)
- 41 - 60: non-structural elements (cut lines)
- 61 - 80: graphic symbols and separator lines for model elements
- 81 - 100: outlines and hatching
- 101 - 120: cut hatching
- 121 - 140: backgrounds
- 141 - 160: cut lines
- 161 - 180: hatching, separator lines and outlines
-
By column (simplified):
- 01 General: Elements that can’t be categorised by function, or to be determined
- 02 2D Elements: Lines, polylines, etc.
- 03 Openings: Doors, windows, etc.
- 04 Objects: From the Archicad Object tool
- 05 Notes: Dimension lines, labels, titles, frames, zone stamps and markers
- 06 Notes Text: For the text associated with 05 Notes
- 07 Walls
- 08 Columns
- 09 Slabs
- 10 Beams
- 11 Stairs/Railings
- 12 Roofs
- 13 Meshes and Shapes
- 14 Zones: Zones
- 15 Mechanical
- 16 Structure
- 17 Electrical
- 18 Hatching: Hatching or patterns that can’t be categorised by element type
- 19 Backgrounds: Fill or pattern backgrounds that can’t be categorised
- 20 General Symbols
This organisation lets the user assign the correct Pen according to the modelling needs while using the same Pen Set. And when you switch Pen Sets, the elements automatically adapt to the desired representation without needing to modify the model, the documentation elements, or the Layer.
Advantages of This Approach
- Clarity and control over graphic representation
- Less reliance on layers to differentiate elements
- Visual consistency across drawings
- Greater efficiency in producing documentation
Conclusion
Migrating from CAD to Archicad isn’t just about switching software — it’s about changing your mindset. Archicad invites you to think in terms of real construction, not just drawing. And understanding the scope of the Pen Table over the BIM model and its generated Views will give you more control over the project, freeing up more time for what really matters: Designing.
Related articles
- How to Uniquely Identify Hotlink Module Zones in Archicad Schedules?
- How to Set the Origin of a 3D Texture in Archicad?
- Why Do Drawings Exported to PDF in Archicad Generate Very Large Files?
- How to Map a Custom Archicad Property to an IFC Property?
- How to Remove an Archicad Educational Licence from a Computer?