
Articles in this section
- How to Uniquely Identify Hotlink Module Zones in Archicad Schedules?
- How to Set the Origin of a 3D Texture in Archicad?
- Why Do Drawings Exported to PDF in Archicad Generate Very Large Files?
- How to Map a Custom Archicad Property to an IFC Property?
- How to Remove an Archicad Educational Licence from a Computer?
- How to Change an Archicad File Started in the International Version to the Spanish Version?
- How to Import a PDF to Use as a Reference in Archicad?
- How to Use Educational and Commercial Versions of Archicad on the Same Computer?
- How to Get the Archicad Connection with Twinmotion?
- How to Create a Structural Frame with the Create Truss Tool in Archicad?
Why Doesn’t the Building Material Cut Fill Appear in the Cut 3D View?
Reading time: 8 min.
One of the most frequent questions we receive as technical support is:
“Why can’t I see the material cut fill in my cut 3D view?”
This issue is usually related to specific settings within Archicad. Below, we explain the possible causes and how to fix them in Archicad.
Cause 1: The Building Material has no Cut Fill assigned
Every Building Material must have a “Cut Fill” defined.
How to check it?
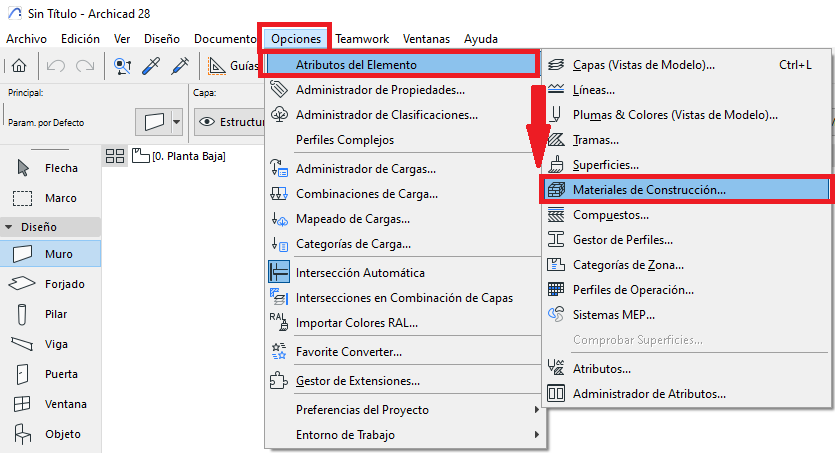
- Go to Options > Element Attributes > Building Materials.
- In the Building Materials dialog box, select the material in question.
- Check the Cut Fill field: make sure it isn’t blank or “—”.
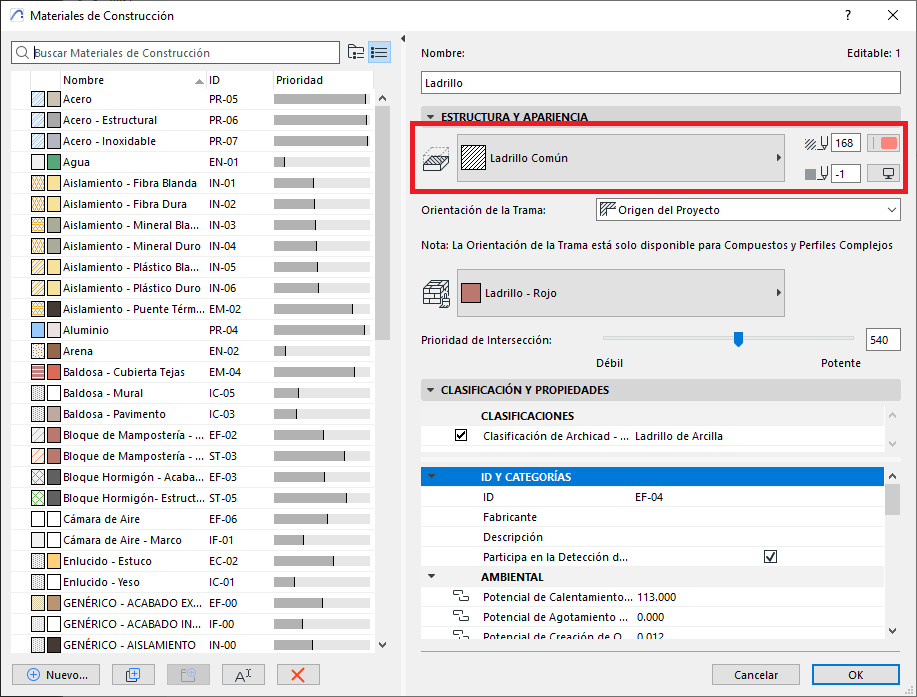
- Set a fill (for example, “Concrete”, “Brick”) and adjust the line and background pens.
Cause 2: The 3D engine doesn’t allow vectorial hatching
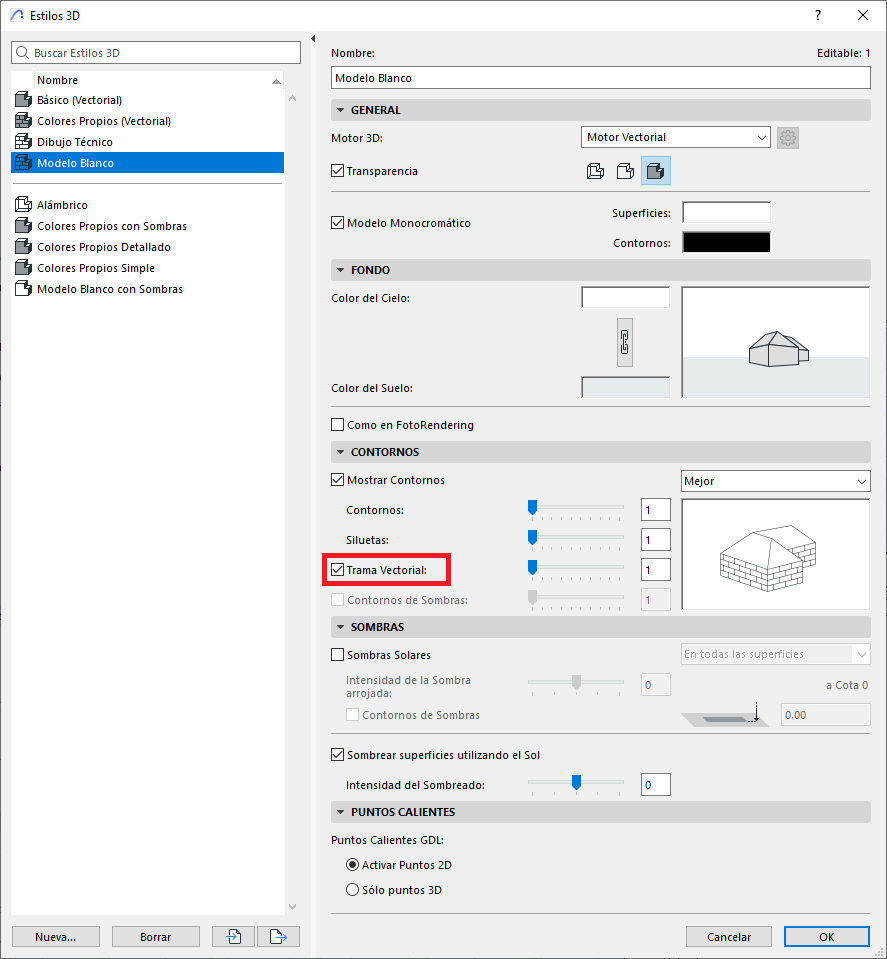
Hatching (fills) in 3D cuts requires enabling the vectorial engine and its specific option.
How to check it?
- Go to the cut 3D view.
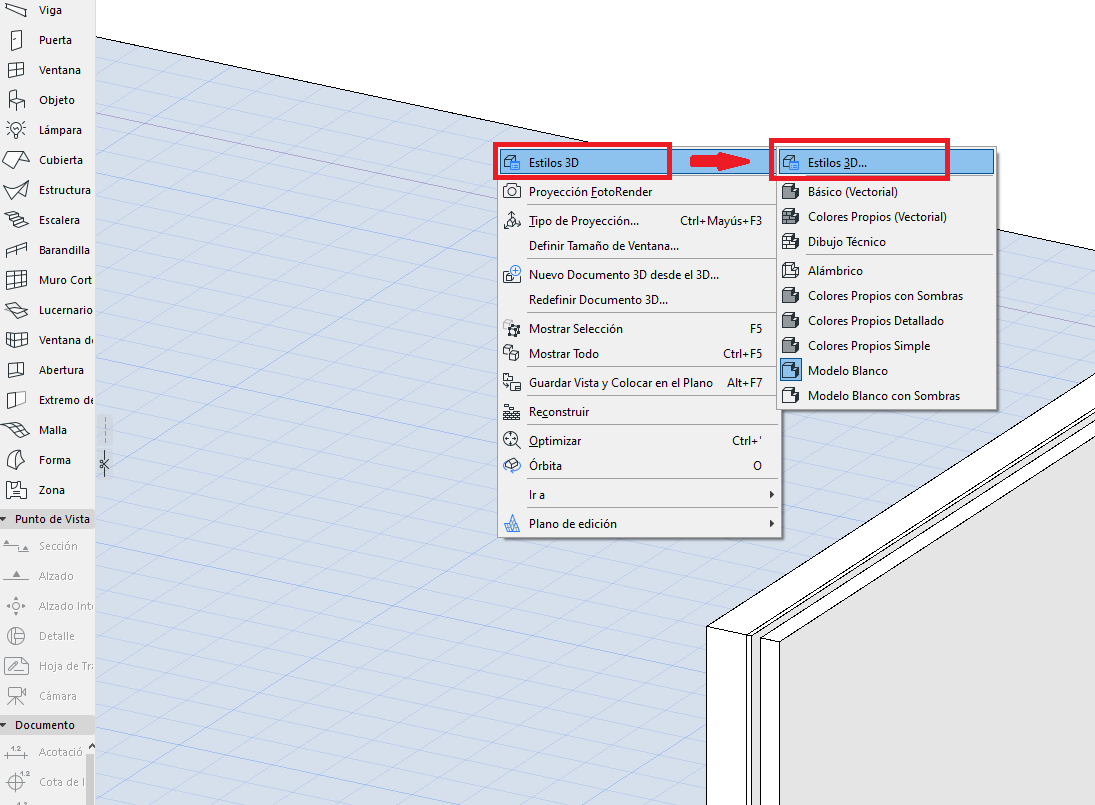
- Open the 3D Styles palette by right-clicking on an empty area of the 3D view.
- In the 3D Styles dialog box, check whether the style being used has the “Vectorial Engine” selected.
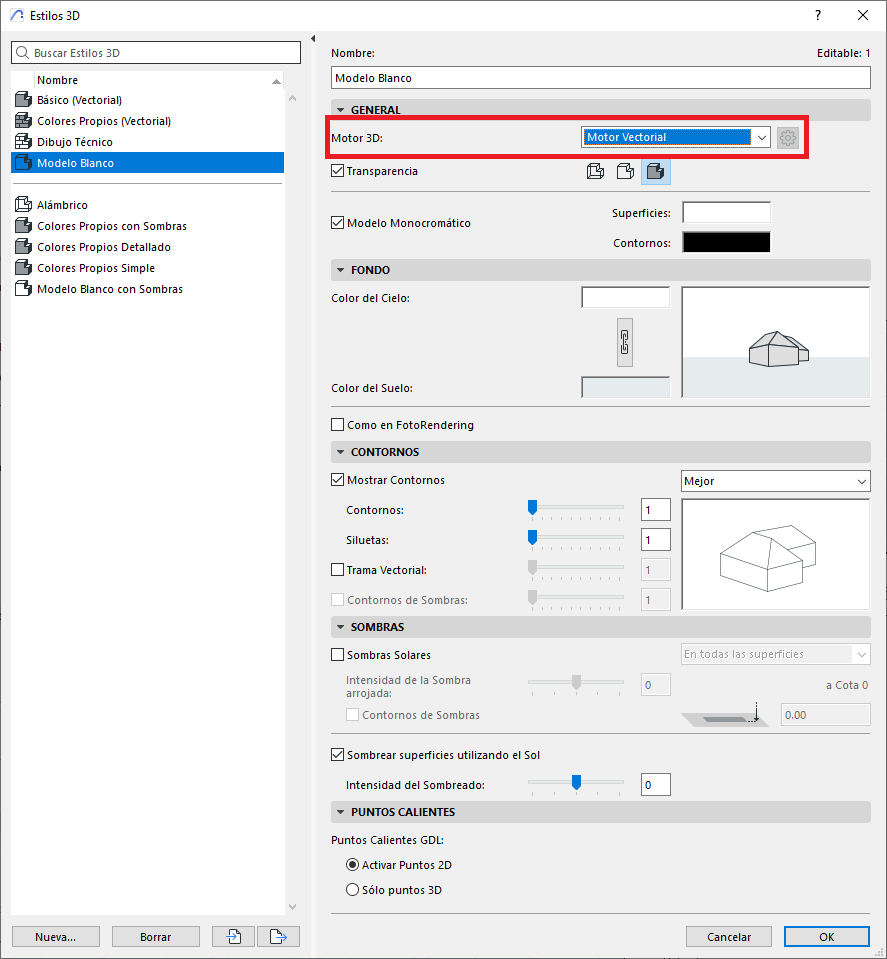
- Check that the Vectorial Hatching option is enabled.
Cause 3: The Section or 3D Document view is overriding the cut appearance
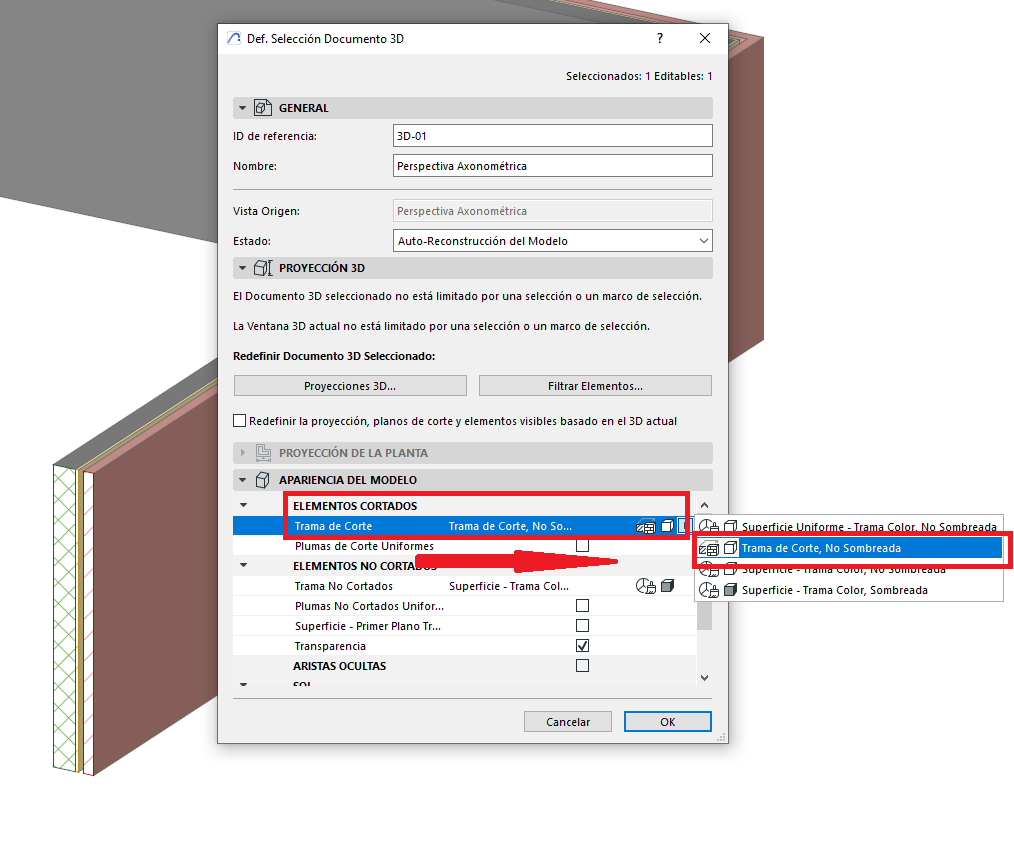
In Section, Elevation or 3D Document views, the model appearance may be set to display a uniform colour or fill.
How to check it?
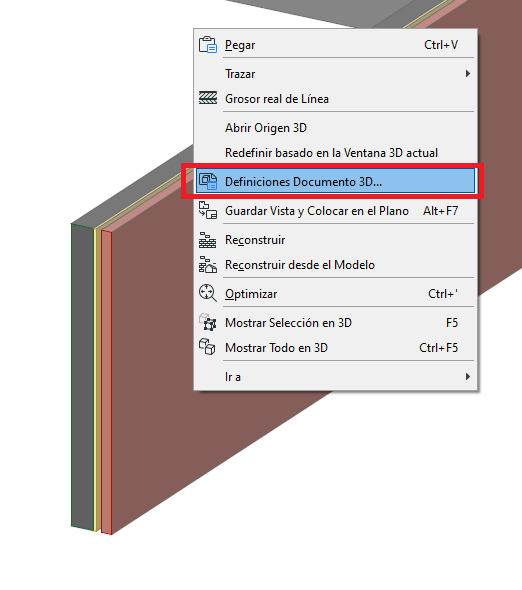
Right-click on the view in the Navigator.
Select 3D Document/Section/Elevation Settings.
Under Model Appearance > Cut Elements, select Own Surface Colors (Non-Shaded).
Cause 4: The element has an active surface override
Some elements may have a custom surface enabled that prevents the Building Material from being displayed.
How to check it?
Select the element (wall, slab, column, etc.).
Open the Element Settings dialog box by pressing Ctrl+T.
Go to the Model panel.
Check whether the Override Surface(s) option is selected.
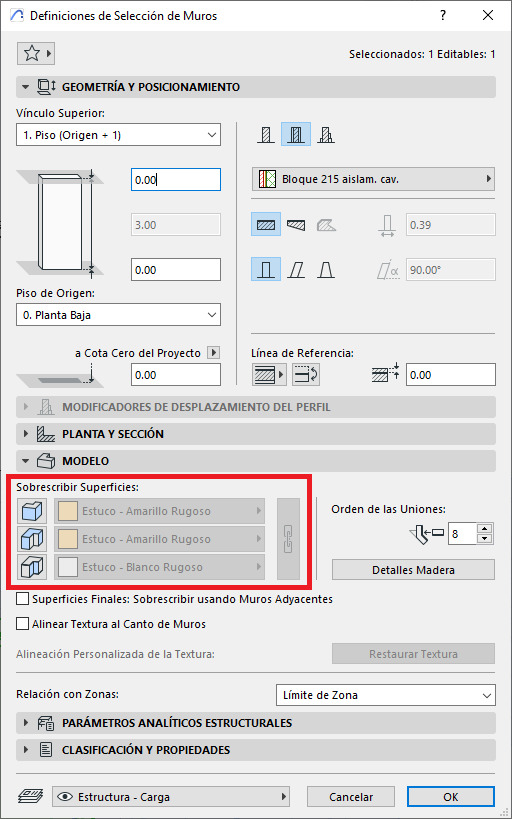
If so, disable it or choose a surface that allows the cut volume to be displayed.
Professional Tip
Create a new 3D Document view with the cut active to see in real time how changes affect the cut fills. This view shows more precisely what will be printed or documented.
Conclusion
When the cut fill doesn’t appear in the 3D view, it’s usually due to:
- Materials without a cut fill
- 3D rendering engine not configured correctly
- Active overrides in the view or model options
- Surface overrides on the elements
Make sure to check each of these points to correctly restore the desired display.
Need personalised help reviewing your project?
Contact the technical support team at my.simbim.es with screenshots and a copy of the file as a PLA if possible.
Related articles
- How to Uniquely Identify Hotlink Module Zones in Archicad Schedules?
- How to Set the Origin of a 3D Texture in Archicad?
- Why Do Drawings Exported to PDF in Archicad Generate Very Large Files?
- How to Map a Custom Archicad Property to an IFC Property?
- How to Remove an Archicad Educational Licence from a Computer?