
Articles in this section
- How to Uniquely Identify Hotlink Module Zones in Archicad Schedules?
- How to Set the Origin of a 3D Texture in Archicad?
- Why Do Drawings Exported to PDF in Archicad Generate Very Large Files?
- How to Map a Custom Archicad Property to an IFC Property?
- How to Remove an Archicad Educational Licence from a Computer?
- How to Change an Archicad File Started in the International Version to the Spanish Version?
- How to Import a PDF to Use as a Reference in Archicad?
- How to Use Educational and Commercial Versions of Archicad on the Same Computer?
- How to Get the Archicad Connection with Twinmotion?
- How to Create a Structural Frame with the Create Truss Tool in Archicad?
How to Map Element Attributes Between Archicad and DXF/DWG Files? Fills
Reading time: 2 min.
When collaborating between CAD programs and Archicad using DXF/DWG files, it's essential to make sure the element attributes between the programs are mapped correctly for successful collaboration.
Setting up the mapping of Fills is an aspect of the collaborative project that shouldn't be underestimated, given that:
- The Fills available between the programs are different.
- An incorrect conversion of Fills can cause a misreading of the project among the project's collaborators.
Mapping Fills
To map Fills from Archicad to DXF-DWG files:
- Follow the instructions in How to Map Element Attributes Between Archicad and DXF/DWG Files? DXF/DWG as a Mapping Template – My SIMBIM Centre
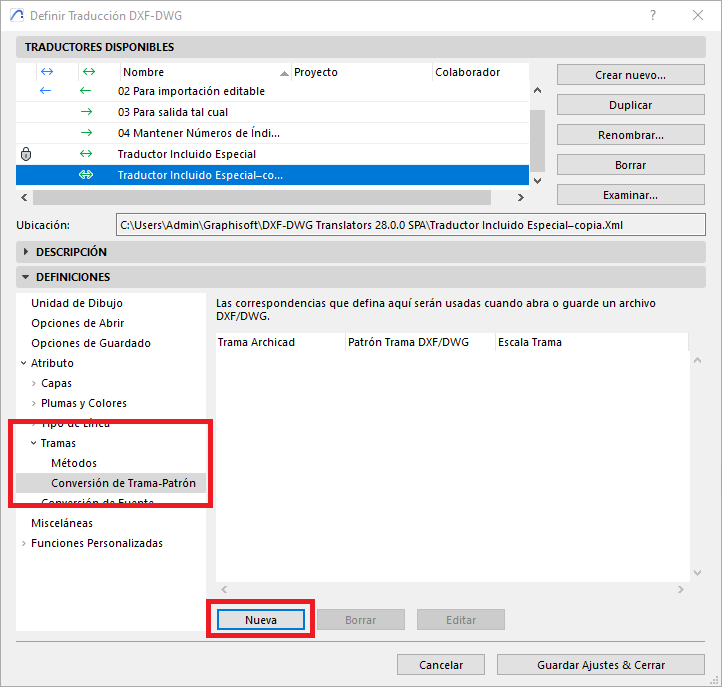
- Go to: File > Interoperability > DXF-DWG > DXF-DWG Translation Setup.
- Select the DXF-DWG translator setup you want to duplicate.
- In the DXF-DWG Translation Setup dialog box, go to Definitions > Attribute and click on Fills.
- Select Fill Conversion Table.
- Click New.
- In the Edit Fill-Hatch Conversion dialog box, in:
Archicad Fill Type (red): select the Archicad Fill.
AutoCAD Hatch Pattern (yellow): select the corresponding AutoCAD Hatch.
Hatch Scale (green): select the scale of the Hatch in AutoCAD.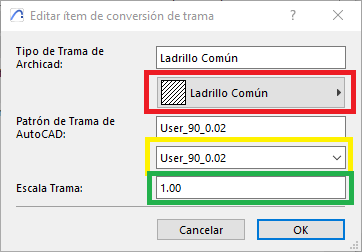
- Repeat this process for each Fill you need to map.
- Save the configuration by clicking Save Settings & Close.
Tips:
- Don't edit the original settings of the DXF-DWG Translators that come by default with the program installation.
- Create duplicates of the customised DXF-DWG Translator settings until you achieve the desired configuration.
- Check that similar Fills are available in Archicad and the CAD program.
- Make sure the Hatch pattern in the CAD program has been used (at least for one element) in the DXF-DWG file that was used as the mapping template in step 1.
By following these steps and incorporating these tips, you can set up the mapping of Fills between your Archicad project and the DXF-DWG files (imported or exported) with your project collaborators.
Related articles
- How to Uniquely Identify Hotlink Module Zones in Archicad Schedules?
- How to Set the Origin of a 3D Texture in Archicad?
- Why Do Drawings Exported to PDF in Archicad Generate Very Large Files?
- How to Map a Custom Archicad Property to an IFC Property?
- How to Remove an Archicad Educational Licence from a Computer?