
Articles in this section
- How to Uniquely Identify Hotlink Module Zones in Archicad Schedules?
- How to Set the Origin of a 3D Texture in Archicad?
- Why Do Drawings Exported to PDF in Archicad Generate Very Large Files?
- How to Map a Custom Archicad Property to an IFC Property?
- How to Remove an Archicad Educational Licence from a Computer?
- How to Change an Archicad File Started in the International Version to the Spanish Version?
- How to Import a PDF to Use as a Reference in Archicad?
- How to Use Educational and Commercial Versions of Archicad on the Same Computer?
- How to Get the Archicad Connection with Twinmotion?
- How to Create a Structural Frame with the Create Truss Tool in Archicad?
How to Change the Zone Stamp in Archicad?
Reading time: 3 min.
By the end of this article, you will be able to configure and change the Zone Stamp shown on the Zones in an Archicad project. The procedure covers assigning the Zone Stamp through the Zone settings and its relationship with Zone Categories.
Prerequisites
- Archicad installed and activated
- An Archicad project open with zones already placed or planned
- Sufficient permissions to modify element settings
Background
The Zone Stamp in Archicad shows relevant information about a zone — such as name, number, area or category — directly on the drawings. These stamps are managed as GDL objects associated with the Zone tool and are filtered according to the assigned Zone Category.
Changing the zone stamp requires:
- Assigning the appropriate Zone Category
- Selecting the correct Zone Stamp object within the Zone Settings.
Step-by-Step Instructions
- Open your project in Archicad.
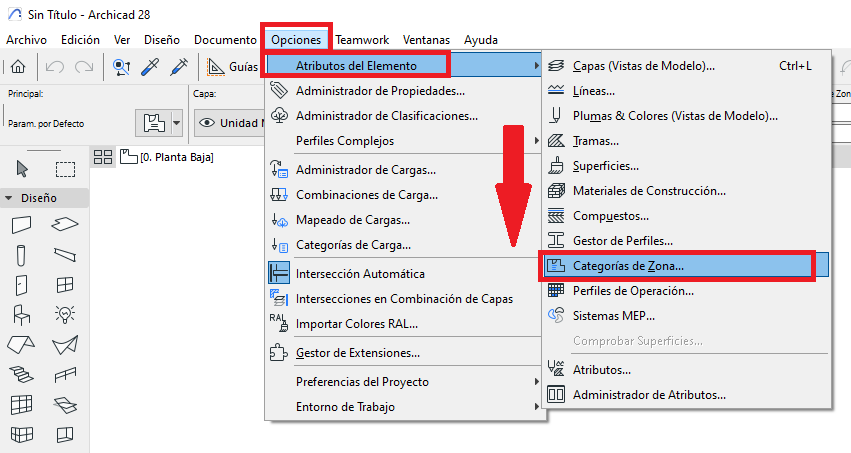
- Go to: Options > Zone Categories.
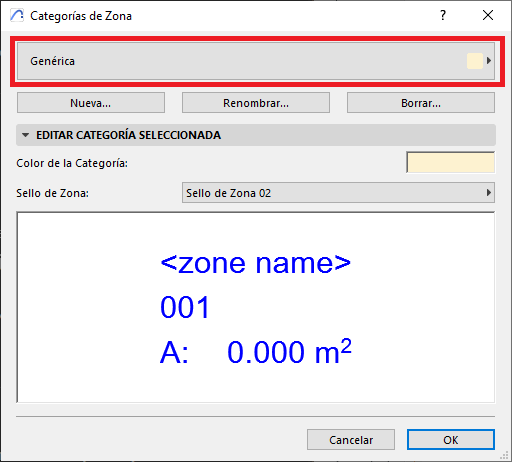
- In the Zone Categories dialog box, select the Zone Category you want (see image).
- Click on Zone Stamp, and the drop-down window will list all the Zone Stamps loaded in the project.
Select an available Zone Stamp and you'll see it applied to each zone you create in the project.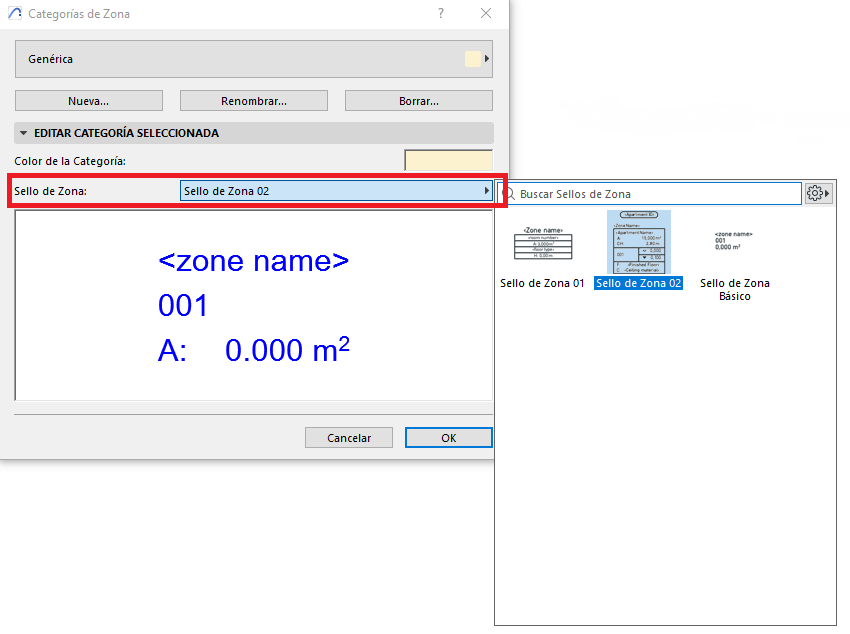
Consultant's Tip
If you need a custom stamp:
- Make sure it's loaded in the project library. To load libraries, see the following link: How to Add or Update Libraries in Archicad? – My SIMBIM Centre
- Check that it's compatible with your version of Archicad.
- Check that it's defined as a GDL object of the Zone Stamp subtype.
- Make sure the Show Zone Stamps option is enabled, as explained in the following link: How to Activate the Zone Stamp in Archicad? – My SIMBIM Centre
Related articles
- How to Uniquely Identify Hotlink Module Zones in Archicad Schedules?
- How to Set the Origin of a 3D Texture in Archicad?
- Why Do Drawings Exported to PDF in Archicad Generate Very Large Files?
- How to Map a Custom Archicad Property to an IFC Property?
- How to Remove an Archicad Educational Licence from a Computer?